Welcome to the land of Shiny


The home of exuberant amateurism.

Saturday 24 December 2011

Merry Christmas to you Cards

Wishing you all a very Merry Christmas and a happy, peaceful, prosperous and creative New Year.

If 2011 was a crapper for you too, then let's believe in the miracle of Christmas and that next year will be full of wonderful surprises, peace and prosperity with a large daily helping of joy, excellent health and happiness.

If 2011 was a fabulous year for you I hope next year is even better.

I have told Santa just how good you've been this year so make sure you hang up a really big stocking tonight, I mean really BIG, you know;
a humungous whopper of a stocking - yes, you have been that good and so have I.


Here are just a few of the Christmas cards I made this year. Each one badly photo'd and wonky, no change there then. If you want to see it wonky even bigger, click on it, if not then just tip your head to the side a little bit.


Happy creating right through 2012!
Gini
xx

Sunday 18 December 2011

Opus Gluei Challenge #120. I'm dreaming of a white Christmas.

The lovely Electra over at Opus Gluei has set the challenge this time and it's whatever "I'm dreaming of a white Christmas" inspires you to create.

Well I thought I would experiment.
Now as you well know, those are really dangerous words for any crafter, because it could all end up in the bin and me in a huff.
So last night at bed time I was in a huff and this project would have ended up in the bin had I had enough time to make something else but, alas, time is not on my side right now so here is my not quite white or quite right Christmas Scene.
Ooops, I was hoping to rescue it with my shiny Cosmic Shimmer watercolours and truly they did help but they cannot perform miracles.

Look through your fingers or out the corner of your eye at this and don't click on it, nobody wants to see it bigger.


If you join in I'm sure you'll make something nicer :-)
Happy Creating!
Gini
xx

Tuesday 6 December 2011

Modified Easel Desk Calendars.

I have been making these desk calendar Christmas presents over the last several months.
This is my version of the fantastic punched screen card tutorial Jane Johnson made for Whiff of Joy Inspirations here.
However I did use my easel aperture card method instead, that I describe here.

I fell in love with this Kanban stamp set Moulin Divas- Tres Chic when I saw it featured in Craft Stamper earlier in the year.
The papers are from GCD studios 8" Paris Nights collection that is just superb.
Click on any picture to make it bigger.
Oh la la.

Calendar 1


Calendar 2


Calendar 3


Calendar 4


Calendar 5


I ran out of steam after the 5th one although I had ideas for more variations, as they do take quite a while to make but some desk calendars I've made in the past are going into their 3rd year with a new set of calendar pages so they can last year after year.

Happy creating!
Gini
xx

Sunday 4 December 2011

Opus Gluei Challenge 119. Gingerbread.

The lovely Jana over at Opus Gluei has challenged us to
Run, run as fast as you can...
and create something inspired by the word Gingerbread.

Like many others I don't like the taste of ginger in any form of sweet or pudding including gingerbread but I do love all the creative ways gingerbread is used. It is practically an art form with my favourite use being the making of gingerbread houses.

So I have made a christmas gingerbread house out of card, paper and a little bit of shiny.

Click on the pictures to make them bigger.


I got the idea from the book Mixed Mania by Debbi Crane and Cheryl Prater,
( I've linked to the USA amazon store only because it has the look inside the book feature which isn't available on the UK amazon site, but you can buy it through amazon.co.uk.)
This book is visually feastworthy and the layout using the idea of a cook book style is very slick, novel and appealing.
Another huge draw for this book is that both these ladies keep up a funny dialogue throughout the book. They are both funny and artists, a combination that is seemingly quite rare, quite why I don't know but there it is.
Do publishers think we can't cope with both together or that we wouldn't want that?
Anyway I recommend this book as a stocking or under the tree treat for yourself.

Undone this is what the house looks like.


It is quite straight forward to draw yourself a template, which is what I did.
Each house panel is a 2 inch square. So draw a 3inch by 8 inch rectangle.
The gable ends (the triangles) are 1 inch deep, so draw a horizontal line at 2 inches up the rectangle and draw your triangle points at 3 inches and 7 inches along the top line.
After you have cut it out, score vertical lines downwards at 2, 4 and 6 inches so your template looks like my photo.
The roof is an ATC size, 2 and a half by 3 and a half inches.
Aha! Have the eyes lit up of the ATC makers out there? Just think of the possibilities. You just need to remember it has to fold in half width ways to make the apex of the roof.

There is another lovely surprise in the instructions for these little houses but I'll not spoil it, you'll have to get the book.

Ingredients.
I used Co-ordinations card in Bon bon for the gingerbread.
I used polar white flowersoft on the roof to make the snow which I stuck down with permanent double sided tape that comes out of roller gadget made by Stick it! I don't have any sheets of double sided tape which would be perfect for this.
A wet glue like white PVA (which you would normally use for flowersoft) over the whole area will warp the ATC and you'll end up with a wonky roof so use a dry glue of some sort.
The card candi is held on the flowersoft using silicon dimensional glue.

Plan how you are going to decorate the sides of your house first before you cut the door and windows in case you need to leave enough room for a particular embellishment.
I needed to leave enough room under my windows for the picket fence.
I cut the windows and doors without measuring using a metal ruler and a craft knife.
I used Martha Stewart border punches in Picket fence and deep edger Garden Trellis which I glued on with white PVA and used Anita's 3D gloss to glue on the bugle beads.
The snow on the sides of the house is Stickles in frosted lace (yes another one Electra!).
Make two holes using a pokey tool, one for the brad and the other for the embroidery floss, see the photo above for placement. Wind the floss around the brad to hold the house together.

My prototype house was this one.


 I didn't like it being held together by 2 pieces of embroidery floss tied in a bow, it looks a bit messy so I change it to a brad and embroidery floss on the gingerbread house.

So are you tempted to join in?
Happy creating!
Gini
xx

Sunday 27 November 2011

Tando Creative challenge for November. Blue and brown.

This month's challenge over at Tando Creative is the colour scheme blue and brown.
This is a colour scheme that I would never normally do but that is the whole idea of a challenge isn't it, to get out of your comfort zone and expand a little bit.

Click on it to make it bigger.


It is a large fridge magnet.
So for this I thought I could probably manage turquoise and beige, and then good old Basic Grey papers came to the rescue with this lovely brown background paper.
I used Tando Creative mini birds and branches chipboard painted in turquoise and beige  acrylic paint overstamped with a section of a Christmas bauble stamp in Brilliance Ink in Mediterranean Blue.
The wings have been stickled with True Blue (Oh be still my heart, if you haven't got this colour of Stickles yet, get it on your Christmas list because it is just GORGEOUS and I'll tell Santa how good you've been.)
I painted white card that I had cut out using nestibles in the same turquoise. I also Overstamped the frame with a text stamp in Brilliance Ink in moonlight white.

I hope you are all getting revved up for the Christmas Fandango coming to a chimney near you.

Happy creating!
Gini
xx

Sunday 20 November 2011

Opus Gluei Challenge #118 Thanks for being You

The lovely Rosemary over at Opus Gluei has set the challenge this time, anything that the quote "Thanks for being you" inspires.

Flowers are so often given as a thank you gift so I made a card using the fabulous Paper Artsy stamps Hot Picks 1004 and their set of steampunk moth stamps.
I used the wrinkle free technique using Inkadinks from the bright range and oversprayed with a silver shimmer spray for the flower, stem and leaves, and Cosmic Shimmer watercolour paints for the moth.


It is amazing just how many pieces of paper can be filled when you spend the time writing down everything you are thankful for.
If your spirit is flagging a bit right now consider giving it a try, it gives you such a boost when you see those pages filling up and gets you in a much better frame of mind.
After the usual suspects of family and friends, my next thankful for thing is electricity.

Happy creating under your electric lights ;-)
Gini
xx

Tuesday 15 November 2011

The Craft Barn's £200 Blog Candy!


Have you seen this yet?
are having a giveaway of
over £200 of crafting goodies !!

What are you waiting for, get yourself over there -
click on either the link or the photo above.

You have until November 25th to enter.
The lucky winner will be announced on their blog by the end of the month.
GOOD LUCK!!

Sunday 6 November 2011

Opus Gluei Challenge #117. What's on your head? Spanky does Clover.

Helloooooo this fortnight's challenge over at Opus Gluei is mine, all mine mwha-ha-ha.
Or rather Spanky's.
Where have you been girl ???
Your adoring fans have missed you.
So tell us then, what's on your head?

It can be any kind of project you like as long as it's got someone or an animal with something on it's head, or even a shelf or a display of hats, something along those lines.
You might fancy going the traditional route and use a hat of some kind, a head dress, a crown, or exotic feathers on a glamorous lady.
You might feel inclined to go a bit wackier and put a fried egg on a dog's head, or a Santa's hat on a chicken, your imagination is your only limitation, anything goes.
Marie Antoinette had a galleon sailing in her wig once I believe.
If you feel like writing a little story to go with your creation I would love that too.
Just a few lines of nonsense, I am easily pleased  (no don't listen to Himself laughing at that, he knows nothing).

Spanky has a bit of a passion for making headresses.

So this is Stampotique's Clover ready for an evening out.
She is planning on dazzling her beau, her hope is that the candle light glinting off her head dress will hypnotise him and make him amenable to her every wish and whim.
Now if you click on her to make her bigger and look at her dear little face, you will see a lady who is prepared to suffer for her ART and her cutting edge fashionability.
Bless her.
Where would we be without style icons like Spanky eh?


C'mon get yer thinking cap on!

Happy creating
Gini
xx

Sunday 30 October 2011

Tando Creative Challenge No 3, Spooktastic October.

This month's Challenge over at Tando Creative is SPOOKTASTIC and I'm entering just in time.

I've used just 1 of the 3 parts of the printers tray from the Mini Printer Tray Round (152mm diameter with stand) pack.
I have split the pack so I can make 3 printer's trays just like I did with this Printer Tray pack.

Click on it to make it bigger, although I must say that the bat's background setting is hopeless, they are never good but this one is particularly pathetic. I couldn't easily find a white area big enough and I didn't exactly go the whole mile in trying to set the scene in ambiance, I think I went roughly 1 and 3/4 inches instead.


I used Distress Inks and Andirondack dye Inks and sponged the backgrounds and used stamp sets:-
Chocolate Baroque - Howling moon
Inkadinkado - All Hallow's Eve

I drew the bat wings and used small black sequins glued on with Anita's 3D gloss to form the wing ribs.

I won't have got it anatomically correct so this bat won't fly, just saying in case you were looking out your window for it.
Although I could always stand outside your window with it dangling on a string and shake it suitably in the style of a bat in flight and for added authenticity I could emit a sonic whistle or audible squeak, what do you think?
(I've got until tomorrow night to get to your house...)

Happy Halloween creating!
Gini
xx

Sunday 23 October 2011

Opus Gluei Challenge #116. Something wicked this way comes.

The lovely Kirsten at Opus Gluei has challenged us this time to make a project to celebrate Halloween so I have followed the Split Coast Stampers Shadow Box card instructions here for this 3D card. But I made the card centre a lot bigger and I punched a Martha Stewart border using Layered Arches and sandwiched that between the side panels for a bit of additional interest.

Mwah-ha-ha.............. Your carriage awaits you and it's ready to whisk you away; past the howling wolf and up, up, up to the creepy castle where your destiny awaits you...

OR if that doesn't tickle your fancy then a huge bar of your favourite chocolate, a foot massage, a large glass of wine, a roaring open fire and the person(s) of your choice :-)
(Feel free to change or tweak any of the above aspects to make your perfect evening entertainment - 'cos I'm helpful like that.)
Click on it to make it bigger.


The stamps are from Chocolate Baroque and are the new Halloween stamp set called Howling Moon. They are gorgeous aren't they?
The spider border and the sentiment is from the Inkadinkado set called Creepy Crawly.
The black ink is Versafine heat embossed with clear fine detail embossing powder.
I sponged Distress Inks in Stormy sky and Chipped Sapphire to colour the card.
I used a white Derwent colour soft pencil to colour the moon and I lightly shaded dark green Colour soft pencil over the foreground of the centre card to give some definition to the ground area. Derwent colour soft pencils work beautifully over distress inks.
The sentiment tag is from the Spellbinders Fancy Tags set.
The fence is Martha Stewart's Iron Fence border punch.

Happy creating!
Gini
xx

Sunday 9 October 2011

Opus Gluei Challenge #115. Back into the swing of things.

Firstly I apologize for not visiting everyone the last few weeks, things appear to be going to hell in a handbasket around my neck of the woods but this too will pass.

The lovely Deena over at Opus Gluei has challenged us to be inspired by the word SWING whether it be literally or getting back into a routine after the school holidays or even a swing in your step.

For me getting back into my crafting swing/routine is making comedy art, or things that make me laugh anyway. So here is a very topical card.
Click on it to make it bigger.

  
We have Jeepers from Stampotique Originals and the cobweb,spider border and bat from this Inkadinkado set called creepy crawly.


I think Jeepers now looks very like an anamatronic fortune teller in one of the machines you used to find in amusement arcades on seaside piers in England.
They always seemed quite creepy to me, but it didn't stop me putting my 10p in for my fortune to be told.

Happy creating!
Gini
xx

Tuesday 27 September 2011

Tando Creative September Challenge, Rustic Charm. Crafty Individuals September Challenge Hanging about.

Second Post today.
The Tando Creative challenge this month is a project based on the theme Rustic Charm.

And the Crafty Individuals challenge this month is Hanging about. A project made for hanging up.

 I was the lucky winner of last month's challenge and I am now able to make things with Tando Creative chipboard hooray!
Thank you so much to the lovely Di at Tando Creative.
Just as I received my winning goody pack I saw on the Crafty Individuals website that they are now stocking Tando Creative Printer's Tray's - swoon - I have been wanting to alter a printer's tray for ages so I ordered some of the different styles they have in stock at the Crafty Individuals webshop here.

First I'll show you what I made for each challenge then I'll tell you how I used the printer's trays if you are still reading by then.

For the Tando Creative challenge I made two printer tray wall hangings because I just couldn't decide on which style of Rustic I wanted to make.

Firstly I made one up as what I would describe as an Old English Rustic Charm Hen House.
Click on any image to make it bigger.


I used K & Co designer papers (sorry I don't know which range but it is an old one), Artemio hens stamps and a little chipboard house covered in designer papers from the Tando Creative Mini Houses and Fences pack. The frame was first given a coat of white gesso then a coat of Juniper Adirondack acrylic paint dabber.

My second is a Dainty Floral English Rose Rustic Charm Hen House.


 This hen house includes step 2 of the 12 step programme for finding your inner grunge.
Step 2: Splodge different colours of acrylics RANDOMLY on your project.
I don't know if I will ever be able to do Step 12 which is colouring outside of the lines, (are you shuddering too?) but baby steps, just baby steps.

Do you have a favourite? Mine is which ever one I am looking at...
But they are both up on my kitchen walls so thankfully I don't have to choose.

My 
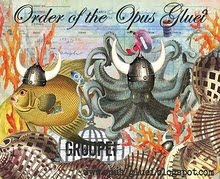
Crafty Individuals Challenge make is another project based on the seashore.
I used the C.I. seaside background papers book 6 (which I have mooned over enough in previous posts) and their seahorse stamp from one of their plates beginning with a C (hmm) and then some numbers *cough*.
The other stamps used are made by Inkylicious, Hero Arts and Chocolate Baroque.
 

Are you wondering how it hangs up?
Well I'm not going to tell you.


Just kidding Mrs.
When I first starting making hanging things I used to make a beaded wire hanger for my projects but they need a nail or a hook in the wall to hold them up.
If you are anything like me, you make lots of new things to hang up and frankly some of my early stuff has needed retiring to the attic but I don't want a wall full of holes as projects come and go, so my cunning plan which has worked well for over 2 years now is to use Scotch Magic Tape.
Do I hear you cry "oooooh do tell!" or was that just wind.

WARNING this only works with Scotch Magic Tape and on emulsion painted plaster walls, there is no substitute tape out there.
You tear off a piece about 2 inches long and then use your fingers to curl it around to make a circle of it with the sticky side facing outwards like this, make sure you stick the two ends together by overlapping them. Thereby making double sided tape.


You then stick this to the back of your project or card, use as many evenly spaced circles as you think you need to hold it on the wall.
For my printer's tray I used 5 circles of tape. One on each corner and one in the point at the top. I usually use 4 to hold a card unless it is particularly heavy for a card.
I have had projects stuck on my emulsion painted walls for nearly 3 years without any bother and when you take them off they do not pull off the paint.

Do NOT use this method to stick onto wallpaper or emulsion painted lining wallpaper, that will only end in tears (in your wallpaper) and tears (in your eyes).

Now onto the Printers tray itself.
It looks like this when it is out of the packaging. I have used the universal size guide dew drop ink to give you an idea of size.


Now the wonderful part of this product is that the tray part comes in 3 pieces that you can either glue all together and make a 6mm deep printers tray OR you can make 3 separate  printers trays that has 2mm deep printers trays.
Seeing as I have no deep items I wanted to display in it I was able to make all 3 trays out of one pack. The pack cost £7.25 so with the help of my trusty calculator each tray cost me only £2.42 to make plus I have a display holder left over that I can use to hold projects for photographing or another project. Happy dancing here.
All I had to do was cut an extra 2 back panels out of thick card for each additional tray.

Happy creating!
Gini
xx

Opus Gluei Challenge #114. Owl always love you. 3D floating front card.

The lovely Electra over at Opus Gluei has challenged us this time to create something using Owls as the theme.
I'm late this week as I've only just got my computer back from the menders with it having been gone a whole week!
Fortunately the sky did not fall down nor did I suffer separation anxiety, both of which comes as a bit of a surprise to me. Who knew you could live without a computer...

I am going through a phase of making projects out of my 3 years worth of Craft Stamper magazines.
I love 3 dimensional cards and this triangle style is just fabulous.
It is a Joanne Wardle designed template from page 53 of the April 2011 edition of Craft Stamper.


I have used Owl with Wings from Stampotique Originals coloured with Derwent Inktense pencils. The background is sponged with Tumbled Glass and Shabby Shutters Distress Inks. The trees are Creative Expressions stamps, create a scene - trees. The seagulls are Chocolate Baroque stamp set Seaside Ted. All stamped with Versafine black and smokey grey inks and the trees are glittered.

Happy Creating!
Gini
xx

Sunday 11 September 2011

Opus Gluei Challenge #113. Dancing with the Poobahs.

Jana has set this fortnight's Opus Gluei challenge as any project inspired by dancing.
Loads of possibilities in this one aren't there?
Good, go get yer gear out and create something then, I am looking forward to coming and looking at what you make.

After I'd done multiple pirouettes in the very tight space that is my craft room (that didn't end too well), I settled down with Twinkie and David Bowie and danced the night away...
Click on it to make it bigger.


In the spirit of finding my inner grunge, did you notice the torn paper?
That was me, I TORE IT.
It's a twelve step plan; Finding your Inner Grunge.
In baby steps, just baby steps.
Although from observation, it seems to be a natural state of being in teenage boys. Alas I am not a teenage boy so I'm having to work very hard at it.

Stamps used Crafty Secrets Twinkle stars which a great little set of clear stamps with lots of different stars including shooting stars, perfect for creating a night scene.
Stampotique Originals; Twinkie; Wee Owl; Small Moon; and Puss Puss.
David Bowie is not a stamp but a singer songwriter. Just saying...in case you are a youngster.

Happy creating!
Gini
xx

Thursday 8 September 2011

Stampotique Designer's Challenge #37 Bookmark and #36 Altering a book page.

This fortnight's Stampotique Designer's Challenge is to make a bookmark.
Not easy if you like dimension, as you can't use it on bookmarks which is what generally puts me off making them.

Hands up who has got the Tim Holtz Filmstrip Frames Sizzix die?
Keep your hand up if you've found a good layout for using it on a card.
No, me neither.
I haven't even seen one out in my travels around blogsville.
The best I can think of is making two, filling them with pictures and putting them mostly vertically but crossing over one another and having some designer paper somewhere.
Or stamping some sort of scene or collage arrangement on a card base and laying an empty filmstrip over it or making snapshots from the scene to go in the filmstrip.
But none of these ideas has inspired me to actually want to make them.

Oooh but I don't need to care about sticking it on a card anymore because I can make bookmarks with it instead and so can you- yay - no more guilt about a white elephant purchase.


Stampotique characters from the top are; Sheer, Heart Throb, Three in a round, Mort has a Pin Curl, and Clover.

I didn't use the whole filmstrip because it is too long for paperbacks and I backed it onto textured red card and coloured with Derwent coloursoft pencils for a change.
I didn't put any ribbon or fibres on it because I don't like using bookmarks that have them, they might look nice and dangly but they are annoying to read with them.  I find it's always better to use my eyes.

I did the SDC#36 Alter a page too but forgot to blog it (I'm still not fit and well and I think my brain is somewhere south of Spain. My body has never been to South of Spain or even Spain for that matter.)

I can't remember where I read the quote that "Real men have duct tape in their trucks". I didn't know what Duct Tape was and had to google it.
(It's that wide grey, cloth backed tape that I know as Electrical Tape, you might know it as John.)
Anyhoo it gave me the idea for this picture in my watercolour book.
Click on it to make it bigger.


It reads: Men are from Mars, Women are from Venus.
Heart throb is saying "Real men always have duct tape in their vans."
Girl with heart Purse is saying "What is duct tape?"
Ha!

Happy Creating!
Gini
xx

Sunday 28 August 2011

Opus Gluei Challenge #112. Everything's coming up Roses (and Rosettes).

The lovely Rosemary over at Opus Gluei has challenged us to make something with roses and rosettes as our inspiration for this coming fortnight.
For a change I wanted to try a different style and make something that Rosemary would make for herself.
Well I crafted myself right into a pickle with this one as I was so out of my crafting comfort zone, but I finally did make something I thought was blogable and that Rosemary would actually like to display on her desk.
This little card is only 3 1/2 inches square.
I thought a yellow rose would be nice and summery.
Click on the pictures to make them bigger.


This side shot is to try and show the sticky up bits.


Materials used:
Spellbinders lacy circles and classic circles small and large.
Papermania Signature,  Rose stamp set (polymer clear stamps). Stuck on with white PVA.
I used silicone glue to raise the inner lacy circle as it was too small for foam pads.
Roses coloured with Derwent coloursoft pencils.

I had a few nice bits of left overs from the nestible die cutting that I thought I would try and make another card from them as I admire so much all the crafter's who can make something wonderful out of a pile of crafting detritus.
Ladies like Godelieve from Stamping Matilda blog who on a Sunday comes up with fabulous cards from her scraps.
So far with my attempts I can only make a similar card of detritus from my scraps as it sure never looks good but I keep practicing. 
Whilst making this card I just had to cut out a few more die cuts which of course has given me some more scraps - I can see this as being a never ending project and probably one without a happy ending.

This card is even more tiny, get your magnifying glass out.
Floating in at 3 1/4 inches.


Ooh a shiny shot, click on it to make it bigger.


Isn't that embossing powder just a fabulous colour!!!
It not only looks wonderful but it has an exotic name to match.
It's Persian Sea Aurora by Cosmic Shimmer.
The trees are from a lovely set of clear stamps called Flight of Dreams by Inkylicious Expressions.

What crafting goodies would you like to marry at the moment?
I would like to marry my spellbinders nestibles and have the Sizzix range as bridesmaids.
The vicar's togs would have to be covered in that lovely Persian Sea Aurora Embossing powder.
The best man would be Chocolate Baroque's new Steampunk Christmas stamps just have a gawk at these beauties.

Weddings or not to go to happy creating!
Gini
xx

Wednesday 24 August 2011

Seaside Box Card


I am still in a sea themed crafting mood.
I have made a box card following Debbie Dolphin's  wonderful tutorial on page 46 of the August 2011 edition of Craft Stamper.

I am entering this card into the Crafty Individuals Challenge - Bright and beautiful. 
I think I've made by the skin of my teeth timewise and I've used papers from the Seaside book of Background papers Book 6, which is my favourite by far of the 6 books of background papers they've brought out. They are so pretty I really couldn't bare to add to them on most of the panels of the card, I'll be braver with them next time.

Also the new monthly challenge by Tando Creative Go wild.
They have a wonderful prize and you have until the end of the month to enter.
I'm just starting to use chipboard shapes in projects so it's a perfect challenge for me.
I think sea creatures are wild enough and they certainly are weird enough, who would ever dream up seahorses, such weird, sad and lost looking little creatures whenever I've seen them in Aquariums.
My gorgeous sea stamps are from Chocolate Baroque that you can find here.
They are inside the box.

I'm also entering the Sir Stampalot Challenge which is Whatever You Fancy this month. They also have a prize and you have until the end of the month to join in.


Happy creating!
Gini
xx

Sunday 14 August 2011

Opus Gluei Challenge #111. Oh I do like to be beside the seaside and all things fishy.

It's my turn this time to set the challenge over at the Opus Gluei Challenge blog.

So are you ready to roll your trousers up, tie a knot in each corner of a man's hanky to wear on your head, get sand in your hair and sandwiches?
Then finally in the early evening, to sit on the beach with your red peeling nose eating fish and chips covered with lashings of salt, malt vinegar and red sauce (Ketchup) out of a newspaper wrapping with a useless wooden fork provided by the Fish and Chip shop and to have the setting sun in your eyes.
Yes?
Well, it's time to put all your seaside memories or fantasies into a piece of art.
It can be based on the beach, sandcastles, donkeys, shells, beach huts etc. It could be something set on the sea, maybe a watersport such as sailing or surfing or just a seagull floating on the sea contemplating his next fish and whether or not he could ever become a pirate.
Perhaps you would rather go under the waves and use fish, mammals and other marine seascapes. Sunken vessels and treasure or mythical mermaids or even Kraken's. I don't know what a Kraken looks like but maybe you could show me.

I decided to represent through the medium of art; The birth of the Stampotique Mermaids.
Now as we all know, mermaids are born out of mermaids purses, which is presumably why groups of young women in the 1980's used to dance around their handbags down the disco often drunkenly and with their singing skills enhanced by the drink in an attempt to lure mortal men to their sides. (Mine's a Barcardi and diet coke please. Why yes, these white stiletto court shoes are very attractive.) They were of course mimicking the mysterious and beautiful mermaids singing to sailors and luring them to some fishy lovin' or to their doom depending on your point of view.
This is a 10 x 12 inch canvas that is shiny shiny shiny.
Click on any picture to make it bigger.


What I used.
10 x 12 inch canvas coloured with acrylics. 
The sea foam is Stickles frosted lace.
The background was covered completely with DecoArt glamour dust glitter paint in Ice Crystal. 
The Derwent inktense pencil coloured mermaids were overpainted with the other colours of DecoArt glamour dust glitter paint.
The text is Tim Holtz Sizzix Alterations die cutter called Typeset (which is already falling apart after about 8 uses, so it has not been a good purchase for me.)
Other Stickles colours used were Waterfall and True blue.
Fushia glitter glue by Glitz-it.
The seaweed is one of the Spellbinders shapeabilities from the foliage set.
The various swirls are from two different Sizzlits Medium sets; Butterfly, Flower and Swirl set, and the Decorative flourishes set.
The fushia border diecut is from the Papermania chipboard set called Floral.

Hope you are inspired to join in.

Plus I am entering my Mermaids Purses canvas in the Alter It monthly challenge Sirens, Mermaids and the deep blue sea.

Happy Creating!
Gini
xx


Saturday 6 August 2011

Dress Form Canvas using Tim Holtz Die Sewing Room

I'm entering this canvas in the Crafts and Me Challenge 46 which is the theme, Anything goes.

I'm also putting it forward for My Mojo Monthly and the August theme of Muse it and Use it.
This splendid project is the brain child of a lady called Sarah (Sasa) whom I've not come across before but is very talented (makes amazing Clean and Simple cards amongst many other styles) and she gives lots of creative ideas and interviews a well known artist each month and she also asks you to talk about your project and your creativity.
She interviews colourer extraordinaire and fabulously diverse paper crafter  Kim Dellow this month, Craft Stamper published amongst many others and member of many Design Teams past and present.
Now Kim says she's just starting her creative journey so that would make me a single celled egg still waiting to split ;-)
Kim also says the best way to improve your paper crafting is practice practice practice. Which is so true and so obvious, but like many obvious things unless some one points it out to me I don't necessarily realise these obvious things.
I think this is a good example of how beneficial pointing out the obvious can be!
It's a great post, interview and blog do check it out if you have the time.

My contribution to this topic is not to underestimate the usefulness of designer papers to get a stalled project completed. 
How many projects do you have hanging around unfinished because you've made a mess of the background or other part that you created yourself?
Which ink, stamped or paint background didn't go right for you and so your project remains unfinished because you got disheartened by your efforts?
When this happen to me which is often, I go look through my designer paper stash and see if there is one I can use to rescue my project or I buy one especially for it.

This 5 by 7 inch canvas is an example of how a Designer Paper got this project finished.
Underneath the Tim Holtz designer paper background (from the Vintage Shabby pack) is a really boring acrylic painted background I made that I thought was too mheh, on top of that is the ugliest mess I've seen in a long time which was my first attempt at collaging torn book pages and torn designer papers and tying them together (I use this term very loosely) with more acrylics.
I'd already made the embelishments, the die cut sewing room and tattered florals by Tim Holtz and was pleased with them but was disheartened at this point with my canvas and ready to give up.
So I found a designer paper that complemented the embelishments  and got this project finished and me smiling again.

One of the questions Sarah asks her interviewees is "You are going back-packing in the Himalayas for a year and may only take 3 crafting items. Which - and why?"
My answer would be a mirror, tweezers and a back up pair of tweezers 'cos I ain't making nothing with whiskers on my chinagin. 

Click on it to make it bigger.  Said the bishop to the actress. (That one's especially for you Linda, I bet that afterwards they drank chicken soup.)


I made you all wait for the picture, sorry.

Happy creating!
Gini
xx

Thursday 4 August 2011

Stampotique Designers Challenges 34 Flower Power and 35 Red, yellow and orange and 35.

 The lovely Kaz has set the Stampotique Designers Challenge 35 as the colours red, orange and yellow.
So I've made this one especially for you Kaz :-)
Must have been distracted by shiny things. 

When I was playing Dress Up 2010 I met Halle who told me that my blog made her think of her neighbour's boys saying "must have been distracted by shiny things" when someone misses a play in a ballgame. So this is where the quote comes from, thank you Halle.

Click on to make it bigger and let it be a lesson for all of us shiny lovers.
Quite what the lesson might be escapes me because fish out of water or not, shiny is good.
Very very good.


It's an 10 x 10 inch picture. I used acrylics on 300gsm watercolour paper for the background desert, yes I know it's not lifelike but I'm using artistic license because I'm an Artiste *cough*.
The cactus is the same watercolour paper cut into a cactus shape, painted a dark green and when dry I added heaps and heaps of green and gold glitter glues mixed together and piled on top.
Sorry about the cactus being green Kaz, but it's a cactus and it has to be green otherwise it would be just a strange coat rack.
I've used the three Daniel Torrente's mermaids from Stampotique Originals.

The lovely  Gez set the previous SDC 34 as Flower Power.

So the question I was pondering - Can the power of flowers get the boys to the promised land?
Well, I would have to say that depends totally on the mood of the lady and has nothing to do with the flowers.
There are certain times of the month when even flowers sporting enormous diamonds aren't gone to get the boys to first base.
Nope, not a hope in hell.
But Weasel is ever hopeful and with a line like this how can he possibly fail?
Click on it to make it bigger (which is possibly a better line for Weasel to use).


It's a very red card isn't it? 
Now this phrase is new to me but you may have heard it before. My son was watching Fred on youtube.com and it was a line on one of the videos. I like Fred's Annoying Orange videos. But I think it's the marmite effect though, love it or hate it.
I love romance and chickens.

Happy creating!
Gini
xx