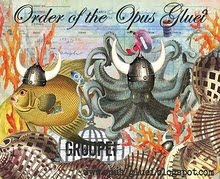


This is an A4 picture I have just finished and framed for my Mum's 81st Birthday.
It is using some more of the very first pack of designer paper that I bought and I still love it AND I have a big pile of it so I will still be using it when I am 192. I will shinify my zimmer with it.
DCWV Pocket full of Posies 12" size.
It is inspired by Zetti style but mainly artist Allison Strine's work.

I bought the digital bird images from www.magicpug.com
They are copies of old paintings of parrots and other exotic birds.
I resized the birds to suit the A4 size and just printed off their heads to use.
There are some great images for sale there.
I now have two ways of altering designer paper to fit a project.
1. Use white gesso to tone it down or scruffyfy it.
The green patterned paper was a bit too bright for the grass so I painted white gesso over it and immediately wiped some of it off again using a baby wipe.
2. Brayer an ink all over it and then spritz some mica powder mixed with water in a Tim Holtz mini mister.
I needed some jazzy shiny brown cardstock for the tree trunks so I transformed a piece of the purple and orange card in the pack. First I brayered over all of it using Adirondack dye ink in currant. Then I mixed up some dark greeny bronze mica powder with water and spritzed it all over. Lovely shiny.
I can't say enough good things about a Speedball brayer used with inks.
Apart from using the brayer to make background ink patterns you can
- Ink up large stamps really evenly if you apply the ink to the stamp using a brayer.
- Ink up stamps with more than one colour of ink. I don't know how many times Craft Stamper instructions have said ink up your stamp with these colours without saying how to do it without contaminating your ink pads with the other colours. So I realised that if you ink one half of your brayer with one colour then turn it round and ink the other half with another colour and leave a little gap in between the colours you don't mix colours on your ink pads. Then use your brayer to ink your stamp in the different colours and any contamination of colours won't matter because it'll be on the brayer and not the ink pads. Sorted at last.
Gini
xx