Welcome to the land of Shiny


The home of exuberant amateurism.
Showing posts with label Alter It Monthly. Show all posts

Sunday, 14 August 2011

Opus Gluei Challenge #111. Oh I do like to be beside the seaside and all things fishy.

It's my turn this time to set the challenge over at the Opus Gluei Challenge blog.

So are you ready to roll your trousers up, tie a knot in each corner of a man's hanky to wear on your head, get sand in your hair and sandwiches?
Then finally in the early evening, to sit on the beach with your red peeling nose eating fish and chips covered with lashings of salt, malt vinegar and red sauce (Ketchup) out of a newspaper wrapping with a useless wooden fork provided by the Fish and Chip shop and to have the setting sun in your eyes.
Yes?
Well, it's time to put all your seaside memories or fantasies into a piece of art.
It can be based on the beach, sandcastles, donkeys, shells, beach huts etc. It could be something set on the sea, maybe a watersport such as sailing or surfing or just a seagull floating on the sea contemplating his next fish and whether or not he could ever become a pirate.
Perhaps you would rather go under the waves and use fish, mammals and other marine seascapes. Sunken vessels and treasure or mythical mermaids or even Kraken's. I don't know what a Kraken looks like but maybe you could show me.

I decided to represent through the medium of art; The birth of the Stampotique Mermaids.
Now as we all know, mermaids are born out of mermaids purses, which is presumably why groups of young women in the 1980's used to dance around their handbags down the disco often drunkenly and with their singing skills enhanced by the drink in an attempt to lure mortal men to their sides. (Mine's a Barcardi and diet coke please. Why yes, these white stiletto court shoes are very attractive.) They were of course mimicking the mysterious and beautiful mermaids singing to sailors and luring them to some fishy lovin' or to their doom depending on your point of view.
This is a 10 x 12 inch canvas that is shiny shiny shiny.
Click on any picture to make it bigger.


What I used.
10 x 12 inch canvas coloured with acrylics. 
The sea foam is Stickles frosted lace.
The background was covered completely with DecoArt glamour dust glitter paint in Ice Crystal. 
The Derwent inktense pencil coloured mermaids were overpainted with the other colours of DecoArt glamour dust glitter paint.
The text is Tim Holtz Sizzix Alterations die cutter called Typeset (which is already falling apart after about 8 uses, so it has not been a good purchase for me.)
Other Stickles colours used were Waterfall and True blue.
Fushia glitter glue by Glitz-it.
The seaweed is one of the Spellbinders shapeabilities from the foliage set.
The various swirls are from two different Sizzlits Medium sets; Butterfly, Flower and Swirl set, and the Decorative flourishes set.
The fushia border diecut is from the Papermania chipboard set called Floral.

Hope you are inspired to join in.

Plus I am entering my Mermaids Purses canvas in the Alter It monthly challenge Sirens, Mermaids and the deep blue sea.

Happy Creating!
Gini
xx


Wednesday, 27 April 2011

Alter It monthly: April - spring into Easter. Spanky does The National Portrait Gallery

Over at Alter It Monthly we can either use cogs and sprockets (I have no idea what these are) for a Steampunk make or use spring colours.
So I went for the spring colours - yay sunshiny!

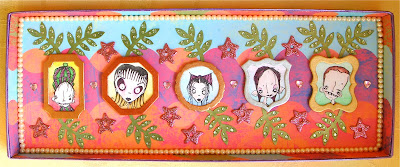
The curators of the National Portrait Gallery thought the decor was looking a bit tired so they asked Spanky if she could perk it up a bit.
I was able to get some photo's of the most famous faces there after Spanky's devine facelift.
Click on any image to make it bigger.


This started out as one half of a chocolate box.

I'll leave you with a lovely lovely thought.
Can you imagine what Spanky could do with our green and pleasant land if she was given free artistic reign for a little bit of shiny revamping of all our National Treasures?
(Actually I think Spanky is a national treasure.)
It's a wonder that she wasn't asked to dress the bride for Friday (Kate and William).

Happy creating!
Gini
xx

Tuesday, 26 October 2010

Gizza sweet. Girl's from the Black Stuff?

This piece is for two challenges.

Alter It monthly for October. Which is "To spook or not to spook".  I've altered a box that held my wrinkle cream into a Halloween treat container. So it's almost turns your wrinkles into sweets doesn't it? What could be nicer.

and

Stampotique Designers Challenge. SDC#17. Treat Container.
I was really hoping that whatever challenge #17 was going to be I would be able to enter Moth Fab in layers.
But it was not to be.
Although Moth Fab could possibly be considered as being a treat container herself in her underwear, I thought you might throw things at me for my audacity, so I made something else instead.
Although if I was sure it would be Cathedral City Cheese that you threw I would have entered her. Mmm cheese.

This time last year I would not have anything to do with Halloween Art and I am really a bit amazed that I made this.
I was made bold by Kaz's journal page called Naughty Weasel, as she has made this rather sick but completely brilliantly funny piece over on the Stampotique Designer's blog do go have a look if you dare!
 I did and I'm a real scare-dee cat when it comes to spooky things but this is more funny psychotic than spooky.
I say that as if funny psychotic is better somehow, which means I need to review my medication ;-)

So I came up with a rather gory Treat Container all splattered in fake blood courtesy of Dylusions Post Box red spray ink.
I did add lots of gold mica for shininess, so that makes it alright doesn't it?
( The gold mica doesn't show up in the photo's because if I added any shiny shots this post would stretch all the way to China.)

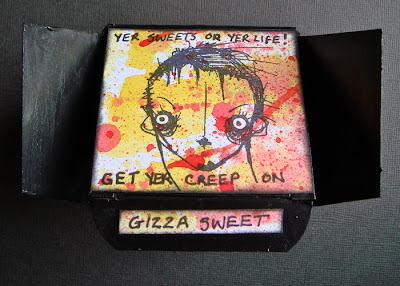
Gizza sweet. Girl's from the Black Stuff?

Click on any picture to make it bigger.


Seeing as there is the expression "Get your craft on" I thought that maybe we could
 "Get yer creep on" for Halloween?
Maybe not, seeing as I'm no trendsetter and I'm ever so grateful I am not responsible for such heinous expressions as "pushing the envelop" or "thinking out of the box" that do the nauseating rounds through large corporations until some other bright spark comes up with another even better heinous expression that everyone can run around spouting or sprouting even.

Top of the box.
Which actually means the top of the box, and not some wank.
(Sorry Mum but I really feel it was merited on this occasion.)


Open box.


One Side of the box


The other side of the box


Front of the box


Back of the box


Inside of the Box is Heart Throb who has a most unfortunate dribble of red ink on his brainbox that looks like a pickaxe was recently removed.
 Notice the lovely blue tissue paper lining for all those lovely Halloween treats such as Eye of Newt and Chunks of Spleen, which are selling like hot cakes in Asda this week.


This is the box before altering.


Stamps used were Stampotique.
The Ladies: Clover, Muffin, Jeepers and Miss Snottie.
The Boys: Heart Throb, Smile and Mort has a pin curl.

Now I have been tardy in the last few posts and not said how I made it.
This is going to be an awfully long post if I do one now so briefly with the main points only.

I used Reeves Black acrylic which is a soft sheen acrylic which has a very dense coverage and an ability to stick to a fairly shiny surface without the need for Gesso, so is perfect for a bit of altered art but not very good for writing on if you were to use it on a journal page. You would do better with a matt acrylic that pens can write on easily for journaling. (My opinion only.)
I used black stazon ink for the stamping because of the gold mica sprayed on the card and I thought it was guaranteed to adhere because it's Stazon. Mmm almonds.
The tissue paper was glued on with Golden Gel Medium around the top of the box only.
Gel medium is your fall back glue for Altered art.
If it wasn't so expensive to buy in the UK I would use it much more often as it will stick most things together and dries within seconds and thereby defies gravity.
These two properties make it an absolute must for a place in your glue arsenal if you like altering things.
Just to clarify, you don't need Golden Gel Medium if you want to alter your hair colour, you need a hair dye for that which is something else entirely.

So get yer happy creative creep on (or not) this week folks!
Gini
xx

Friday, 23 July 2010

Alter It Monthly Challenge. July 2010, Home Sweet Home - Flora's Round House

I recently found a new altered art challenge site that is monthly - whoohoo!
You can find it here. They also have a prize up for grabs, which always helps as an incentive.

I made another round house for a very special friend's birthday, the fantabulous card making Sylvia.
Happy birthday to you!

This is Flora by Evelyn De Morgan which is Sylvia's favourite Pre Raphaelite painting.

Now by my reckoning Flora has been standing barefoot in the garden for 116 years so I thought it was about time someone let her in a house to warm up her toes and maybe take a bath.

Click on the picture to make it bigger so you can see some of the glamour dust sparkle.


The interior and shutters are a gentle antique red not the raging RED that appears in the above photo.
I have got the colour better in this next photo. (I couldn't improve it in photo shop any further not with my limited skills anyway, oh dear.)


The house started out life as a 500 gram container of coffeemate.
Dimensions are:
Diameter 4".
Height of container 5.5", roof is extra on top.

I got the idea for the shutters from an article by Gail Milburn on page 72 of February 2009 Edition of Craft Stamper.


How to make it.

The first thing to consider is that it is much easier to gesso and then decorate by painting one of these.
If you want to wallpaper one, then you must be prepared to measure accurately in order to get a nice finish and expect a fair amount of cursing whilst you're doing it.
Once you've made your first one and made all your mistakes with that one it'll be plain sailing on all future ones! I'll show you my first one in a minute so you can laugh at it.

First of all decide what image (if any) is going to lean out of your window.
Size the image by measuring the height of your tin and allow for an inch or so of headroom in the container otherwise your head will get partially hidden under the overhang of the roof.
Once you have printed out your image, then you can decide on the width and the height of the window and how far up the tin the windowsill needs to start to suit your image.
(Next time I make one I'll take photos as I go along, because it is much easier to see how this goes together that way.)
Cut out your window and divided it into two shutters.
Decide whether you want the shutters to sit concave or convex against the sides of the house.
Mine sit concave because it is easier to glue the shutters open that way .
There is another way to do this that I use and I'll explain later.
Then label each shutter Left and Right so you don't get in a muddle with them.

To attach the shutter to the house cut a rectangular piece of card  that measures the height of the shutters and is about 1.5" wide.
Fold in half lengthways.
Glue one half of the rectangle to the side of the shutter that will sit  flush with the house.
Then wallpaper and decorate the shutter completely before you stick it onto the house.
I used the strong double sided tape (red backed) for all my wallpapering.
Your wallpaper can be designer card or paper, either will work fine.
Alternatively you could use gel medium as a glue.
Or if you want a bit of wiggle room then use white PVA but this would be my last chioce of glues for this project.

Then wallpaper the inside of the house.
When you have a window you don't need to glue the wallpaper down, if you have cut it accurately it will stay in place all on it's own as if by shiny magic.
You then stick the shutters onto the side of the house and then wallpaper the outside of the house.
I glued the shutters back in place with strong white PVA and used pegs to hold the shutters open while the glue dried.
For instructions on how to measure everything and how to glue the beads on and make the roof see this post that gave instructions for making this shell house.


The only difference is that on Flora's roof I glued punched out flowers around the bottom of the roof and if you decide to do this you need to make a circular band of card that will sit on the lip of the tin to raise the roof up enough to allow for the roof decorations to sit correctly.

I also used Tim Holtz grungeboard flourishes that I first painted in a bright green acrylic then I used my finger to apply two different shades of metallic green in a random way. Glued them on with glossy accents.
I also added some pearls and bling, lots and lots of glamour dust to the flowers using a Sakura Quickie glue pen.

The butterflies are Anita's Fairy Wings dimensional butterflies with the awful fugly silver holographic edge cut off.
Now as you know I am partial to a bit of shiny, but these butterflies are delicate woodland shades of brown and the very last thing they need is cheap and ugly silver holographic crap on them. So I used my tiny scissors and cut it all off. Off with the shiny! Never thought I would be saying that. Ever.

So onto my very first piece of 3 dimensional art and my first round house.
I did this one with two windows, one front and one back as it were.
I held the shutters open by tying the two shutters, one from each window, together with fancy yarn.
This is a T Rex shrine that I made for Himself as a Valentines present in 2009.
Okay you can start laughing now,
it's very heartening to me to see how I've improved in just over a year.
The photo's are abysmal quality as well which make matters worse.


Okay stop laughing now or I'll cry.

I am behind on visiting everyone and will try and remedy that shortly.

Happy creating!
Gini
xx