The challenge at Opus Gluei this week, really made my brain cell hurt, which is something I rather like :-)
I couldn't come up with anything that would translate into art using the three words, something like the "see no evil, hear no evil, speak no evil" threesome effect, despite sleeping on the idea.
I came up with this instead.
Have you read Phillip Pullman's His Dark Materials Trilogy?
They made the first book into the film The Golden Compass.
An amazing fantasy epic that includes within the brilliant story; fascinating and thought provoking ideas on the subjects of physics, philosophy, theology and spirituality.
Personally, if I am going to learn something I would much rather be taught through a story.
In the 3rd book, The Amber Spyglass there is a land inhabited by Mulefa, a sort of elephant like creature that uses a large seed pod for locomotion.
The seedpod fits on a spur on their front and rear legs and they use their side legs to propel themselves along. They illustrate a delicate ecosystem and are non - intrusive users of the land, much like the Aborigines.
If we consider the word wealthy to mean prosperous or enriching in ways other than financial then I think that the Mulefa embody "Healthy, Wealthy and Wise" in their lifestyle.
I can't seem to stop making birds at the moment so I've used a bird to represent the Mulefa.
I know I'm really stretching artistic license here, but I just wanted to make more birds.
I was extremely luck to find some celtic stamps in the bargain bin of my local craft shop.
I love celtic designs but because they are so hard to draw they are perfect as rubber stamps.
£1 for 3 stamps. Whoohoo!!
Once I made one, I couldn't stop trying different versions.
I really want to make about 10 more versions at least, they are completely addictive to make. I'm going to run out of card blanks before ideas on this one.
What am I going to do with them all, because I just have to make some more!
Click on the pictures to make them bigger.
I was a bit impatient to take the photos and doesn't it show!
I drew the bird body and wing shape on card and then cut them out to make templates.
Luckily they just fitted on a 5" x 7" card blank.
I keep forgetting to pick my card blank first and make sure everything I draw will fit on it!
I used Versafine black ink. Some freebie papers that came with a magazine.
I used cut and dry foam and versamagic black chalk ink to edge the bird shapes.
I also used some Inkadinkado Button stamps and flower patterns stamps.
The large daisy flowers are from Graphicus, part of the Daisy and Butterfly plate.
I used foam pads to stick on the wheels, bird bodies and wings.
For the Celtic bird bodies I masked out some of the circle stamps to avoid overstamping and I drew around the bird body template first onto white card to get an idea where to place the stamps.
The inkadinkado flower stamps were clear so I could see where to stamp them without masking.
I used either jewels or Sakura stardust pens for the eyes.
Happy Creating!
Gini
xx
Welcome to the land of Shiny
The home of exuberant amateurism.
Thursday, 20 May 2010
Friday, 14 May 2010
Opus Gluei Challenges #50, #51, #52 and #53
If you fancy joining in with this weekly challenge blog you can find it here.
Run by two lovely and funny ladies Rosemary and Jana.
4 challenges in one post, nothing to brag about unfortunately, it just means I never got around to taking photo's and writing any blog posts for them. I can't even blame Spanky. Tut tut to me.
As I've said before I'm having a go at making layout cards.
Normally my idea of making a card is to make a picture and stick it onto a card blank. After the first time I did this, I started making the picture in the dimensions of the card blank which always helps matters.
I then see if I can fit a sentiment on it, if not, oh well never mind.
So this is exactly what I did for this challenge.
Click on any of the pictures to make them bigger.
#50 For the Birds
I drew all the pieces first on tracing paper and then cut them out of designer papers, K and Co and Basic Grey.
The bird ( his wing stuck on using a foam pad) and branch pieces are glued on a piece of designer paper using white PVA.
Then that was glued onto a card blank using double sided tape.
The crown is a woodware punch.
An unusual shaped googly eye for his peeper.
Sentiment is slapped on as an after thought. It's from a graphicus stamp set of Birds.
#51 Make a Set
Whilst these look quite plain, they took me ages and ages.
I was getting the hang of using nesties on my big shot and trying to decide on a layout and how to use a edge punch etc. So I worked out how much this first card would cost to buy if I based it on my day job's hourly rate.
For just time and not materials £46.30!
Well, I'd better keep the day job then.
I used a new out Dovecraft set of Birds stamps. Coloured with watercolour pencils.
An interesting thought about watercolour pencils.
20 or so years ago I bought a set of Caran d'ache Prismalo I watercolour pencils. Now they cost about £20 - 25 for 18 pencils.
I also recently bought 12 watercolour pencils from Asda for £1 to see how they compared.
I cannot tell any difference between them.
They are the same in blendability, colour density, sharpen-ability. They both give a smooth ungrained colour when blended with water. Something to think about.
For this next card I made up the quote, because really what else could it be?
Isn't he/she a brilliant little chap?
He's from the same Dovecraft set.
I used labels 1 and 8 and circles in nesties shapes all glued on a DL card blank with white PVA.
I coloured the eggs with cosmic shimmer watercolour blocks.
I used a Brilliance inkpad in Mediterranean blue.
#52 Happy Anniversary. Make something.
This is the only card I have managed to use some ribbon on. I have yet to get the hang of using ribbon on cards.
It's a Papermania sheep stamp. Stamped onto some designer papers with the head stamped again onto a purple spot paper and layer on the body with foam pads. An Inkadinkadoo Happy Birthday stamp, stamped on the same green paper as the sheep's body. Layered on to nestie cut card, all glued with white PVA to a piece of yellow card. The ribbon is stuck on with double sided tape. I put some glossy accents on his nose, the blacks of his eyes and the black of his ears and feet.
Can I just say something about Labels 10? It's one of the new Nesty releases.
It offends every single artistic sense I have.
It is ugly both set vertically and horizontally.
In fact I find it so ugly that it is FUGLY.
It is also everywhere on cards at the moment so it is obviously popular but to me it is like looking at the equivalent of a road crash on a card.
#53 Can I quote you on that?
Why, yes you can!
I think this is a quote from one of the Positively Pooh books. Although I can't quite remember.
I just love this colour scheme. Love it.
Light yellow, light grass green and cherry purple.
I have made a right hash of photographing it though. I tried all sorts of background colours and a darker green was still a poor choice.
I hand drew a flower template, which took ages to get right. I stamped one of the Julia faces from Cherry Pie stamps onto white card and used a nesty circle to cut it out. Used whispers brush pens to colour her in.
The petals are cut out from Dovecraft's Funky Vintage 6x6" paper pack.
An extraordinary collection of nice funky grunge designs and appallingly fugly '70's patterns.
I don't understand what is supposed to tie this weird collection together at all. Picky, picky today, but hey it's my blog!
I freehand edged the petals with a fine tipped felt tip in cherry purple.
I cut rough leaf shapes from an old book page, tinted them green with pale green watercolour paint, edged roughly with a green brush stroke pen. Glued onto a designer piece of paper with white PVA, Tim Coffey Daisy Pad K & Co.
I used pinking scissors to cut around the paper.
Edged using cut n dry foam, Adirondack dye ink in Wild plum to edge the pinking cut.
I used double sided tape to mount it on core'dinations vintage range of card and then onto mount board. I edged the cream mount board with a green brush pen.
I strung beads onto 20 gauge beading wire that I stuck onto the back using strong double sided tape covered over with magi tape.
I stuck the sequin ribbon on with thin strong double sided tape and used glossy accents to hold on the bling.
Happy creating!
Gini
xx
Thursday, 13 May 2010
Dress Up 2010. Spanky does feeling gay in the month of May.
Evangaline asked Spanky for something fresh, bright and cheerful, something she could wear anywhere.
Now I can't see Evangeline doing her weekly shop in Asda in this outfit, she'll never even make it through the fruit and veg section with all those precious jewels on display like that.
Click on it to make it bigger.
In case you want to join in or have a gawk at everybody else's dresses you can find May's dresses here and it's Mr Linky which makes it so much easier.
Hope you are all having a fabulous week.
I can feel a posting frenzy coming on which has got to be better that a rabid dog frenzy coming on.
Happy creating!
Gini
xx
Saturday, 8 May 2010
Dress Up 2010. April
Yep, I know it is May but that one is also done and so is June's, so there!
What happened was, in typical Land of Shiny fashion I started April's dress back before we had the lovely 3 weeks of sunshine and I was feeling the winter blues, so go out my watercolours and made a dress that could only be for a June ball.
So I tried again and designed a new style of dress and got halfway through December's dress before I remembered to STOP and make April's dress.
Then other things got in the way.
So here we are in May with me making a million and a half excuses.
Yes, I know Spanky is never late with her dresses.
The way I see it is that there are two ways of approaching this dress making challenge.
You can make a piece of art that just happens to be in the shape of a dress or you can make a miniature dress with collars and belts etc.
So far I have been making miniature dresses.
Each month so far I have tried to do the piece of art style but couldn't because it was very firmly a little wearable dress.
But not so this month.
Be kind because this is my first go at proper Craft Stamper magazine style stamping and distressing. Well as much distressing as my little accurate and neat art freak self could stand.
This is not Land of Shiny style at all.
Be kind because this is my first go at proper Craft Stamper magazine style stamping and distressing. Well as much distressing as my little accurate and neat art freak self could stand.
This is not Land of Shiny style at all.
Click on it to make it bigger.
How I made it.
I used a 6 inch square piece of Papermania Exquisite collection and the wonderful wonderful set of stamps from 7 Gypsies called Victoria I think. I'm looking at the packaging and it's not very clear and it also says (spelling mistakes included) "Intended for childeren over age 13".
I'm glad someone still thinks I'm young enough to be a childeren!
Anyway I first saw these stamps when the lovely Sue Roddis had that altered book shelf project page 34 of the April 2010 Craft Stamper (you know the one with the free cute dog stamp).
I doubt I will ever be able to do grungy art like that but I had to have those stamps!
I used versafine vintage sepia ink and then once it was dry, wiped gesso all over the stamps with my finger and rubbed most of it back off again with a baby wipe. Ooooh I distressed it. (That technique was in a recent Craft Stamper magazine too.)
I backed it with the same paper using Golden regular gel medium for glue and again forgot to sandwich in a clothes hanger between the two.
Of the six dresses I have made so far I have remembered only once to stick the hanger between the front and the back. Only once, grrr.
What is it that they say?
You can teach an old dog to play a banjo but not teach her new tricks.
Well they are wrong! Because I have a new trick for you.
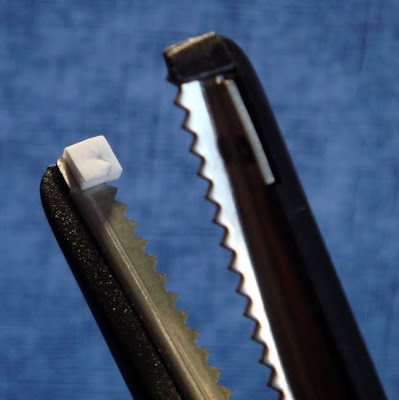
I have found trying to cut with the Fiskars decorative edge scissors nigh on impossible to get a neat finish, but no more!
I stuck a small foam pad to the tip of the bottom blade leaving the paper shield on the top of the foam pad which stops the over cutting, so you can't make a fudge of the pattern.
It works a treat.
Look; here is a picture of my cunning trick.
Click on it to make it bigger.
I feel like I've invented something important like electricity or cheese.
Hopefully tomorrow Spanky will be presenting her June dress on time.
Happy creating everyone!
Gini
xx
xx
Subscribe to:
Posts (Atom)