Ever found yourself caught between a rock and a hard place?
When was the last time you tried the latest crazy diet that didn't work?
Well Two Barrettes definitely wishes she read the small print because she really wasn't expecting this on day 4 of her new diet.
Click on her rocks to make them bigger (snigger).
The Opus Gluei Challenge this fortnight is called "Me and my camera" and you are to use a photo in your project.
The challenge was set by the lovely Electra who makes absolutely gorgeous digital and hand papercrafted Scrap Book Pages and mixed media art.
Well I can tell you that this challenge nearly made me give up the glue. Boo Hoo.
I never use photo's or do scrap booking, it does not appeal to me at all to make it myself, and I tried all week to come up with something scrapbooky with a photo I took of a pebble sculpture years ago in Ilfracoombe harbour.
But I could not manage anything AT ALL.
In the end I gave up and cut out the pebble sculpture and made a person out of it, so I have used part of a photo I took after all - hooray!
The arms didn't look very arm like, so a made a handbag to try and give you a clue that hey, these really are arms, honest.
Hmm.
Happy Creating with Bournville Old Jamaica Rum and Raisin dark chocolate, my favourite yum! So much nicer than rocks...
Gini
xx
Welcome to the land of Shiny
The home of exuberant amateurism.
Showing posts with label Stampotique. Show all posts
Sunday, 26 August 2012
Sunday, 3 June 2012
Queen Elizabeth II Diamond Jubilee celebrations with Drag Dressforms
The Queen Of All She Surveys is pictured here with her dearly beloved family, The Pearly King and little Miss Right Now (Goose Neck is impersonating Joan Collins from her Dynasty Era, yes, doesn't she just!) and probably the most important person present; The Tea Boy.
Enjoy the Jubilee celebrations wherever you and are whatever you are doing.
Click on them to make them bigger.
Happy Jubilee creating!
Gini
xx
Enjoy the Jubilee celebrations wherever you and are whatever you are doing.
Click on them to make them bigger.
Happy Jubilee creating!
Gini
xx
Sunday, 15 January 2012
Opus Gluei Challenge #122. Take a picture it will last longer.
The lovely Kirsten over at Opus Gluei has given the following prompt to get our creative juices flowing "Take a picture it will last longer."
Now I can't say that I use photographs much at all in my art but I often make pictures so I set out to make a picture that would fake the look of fabric in a photograph (WTF) even I can't follow the very convoluted way I have tried to meet this prompt, when I was creating it all made perfect sense to me but in the cold light of day today who knows what I was thinking...my brain cell was not round the front but MIA.
So this fake fabric background that is made of paper but looks like a picture replica of a photograph of fabric..... is a tenuous entry at best for this prompt, but hey I've felt quite poorly this last week and this was my best shot.
Oh but doesn't Gooseneck's dear little face make you smile nestled in that flower?
I took white card, Do Craft's V & A stamp set called V & A quilts- cornfield, and stamped in versamark ink and heat embossed with clear fine detail powder. Used cut and dry to apply Evergreen Bough and Festive Berries Distress inks to make the background.
I coloured a few of the flowers with Cosmic Shimmer Watercolours for a little bit of shiny.
Made a 3D flower using red card and Marianne design die cutting set of flower shapes glued together with white PVA and 3D decoupage glue.
Gooseneck's face from Stampotique.
A spellbinders die for the tag and metallic red card candi.
The sentiment on the second card is a Personal Impressions stamp.
I'm sure anything you make for this challenge will make far more sense than mine.
If you want to see a very clever take on the challenge go see what Electra has made as her brain cell is round the front and isn't budging from pole position.
Happy creating!
Gini
xx
Now I can't say that I use photographs much at all in my art but I often make pictures so I set out to make a picture that would fake the look of fabric in a photograph (WTF) even I can't follow the very convoluted way I have tried to meet this prompt, when I was creating it all made perfect sense to me but in the cold light of day today who knows what I was thinking...my brain cell was not round the front but MIA.
So this fake fabric background that is made of paper but looks like a picture replica of a photograph of fabric..... is a tenuous entry at best for this prompt, but hey I've felt quite poorly this last week and this was my best shot.
Oh but doesn't Gooseneck's dear little face make you smile nestled in that flower?
Then I made another similar card, but it's very boring.
I took white card, Do Craft's V & A stamp set called V & A quilts- cornfield, and stamped in versamark ink and heat embossed with clear fine detail powder. Used cut and dry to apply Evergreen Bough and Festive Berries Distress inks to make the background.
I coloured a few of the flowers with Cosmic Shimmer Watercolours for a little bit of shiny.
Made a 3D flower using red card and Marianne design die cutting set of flower shapes glued together with white PVA and 3D decoupage glue.
Gooseneck's face from Stampotique.
A spellbinders die for the tag and metallic red card candi.
The sentiment on the second card is a Personal Impressions stamp.
I'm sure anything you make for this challenge will make far more sense than mine.
If you want to see a very clever take on the challenge go see what Electra has made as her brain cell is round the front and isn't budging from pole position.
Happy creating!
Gini
xx
Sunday, 6 November 2011
Opus Gluei Challenge #117. What's on your head? Spanky does Clover.
Helloooooo this fortnight's challenge over at Opus Gluei is mine, all mine mwha-ha-ha.
Or rather Spanky's.
Where have you been girl ???
Your adoring fans have missed you.
So tell us then, what's on your head?
It can be any kind of project you like as long as it's got someone or an animal with something on it's head, or even a shelf or a display of hats, something along those lines.
You might fancy going the traditional route and use a hat of some kind, a head dress, a crown, or exotic feathers on a glamorous lady.
You might feel inclined to go a bit wackier and put a fried egg on a dog's head, or a Santa's hat on a chicken, your imagination is your only limitation, anything goes.
Marie Antoinette had a galleon sailing in her wig once I believe.
If you feel like writing a little story to go with your creation I would love that too.
Just a few lines of nonsense, I am easily pleased (no don't listen to Himself laughing at that, he knows nothing).
Spanky has a bit of a passion for making headresses.
So this is Stampotique's Clover ready for an evening out.
She is planning on dazzling her beau, her hope is that the candle light glinting off her head dress will hypnotise him and make him amenable to her every wish and whim.
Now if you click on her to make her bigger and look at her dear little face, you will see a lady who is prepared to suffer for her ART and her cutting edge fashionability.
Bless her.
Where would we be without style icons like Spanky eh?
C'mon get yer thinking cap on!
Happy creating
Gini
xx
Or rather Spanky's.
Where have you been girl ???
Your adoring fans have missed you.
So tell us then, what's on your head?
It can be any kind of project you like as long as it's got someone or an animal with something on it's head, or even a shelf or a display of hats, something along those lines.
You might fancy going the traditional route and use a hat of some kind, a head dress, a crown, or exotic feathers on a glamorous lady.
You might feel inclined to go a bit wackier and put a fried egg on a dog's head, or a Santa's hat on a chicken, your imagination is your only limitation, anything goes.
Marie Antoinette had a galleon sailing in her wig once I believe.
If you feel like writing a little story to go with your creation I would love that too.
Just a few lines of nonsense, I am easily pleased (no don't listen to Himself laughing at that, he knows nothing).
Spanky has a bit of a passion for making headresses.
So this is Stampotique's Clover ready for an evening out.
She is planning on dazzling her beau, her hope is that the candle light glinting off her head dress will hypnotise him and make him amenable to her every wish and whim.
Now if you click on her to make her bigger and look at her dear little face, you will see a lady who is prepared to suffer for her ART and her cutting edge fashionability.
Bless her.
Where would we be without style icons like Spanky eh?
C'mon get yer thinking cap on!
Happy creating
Gini
xx
Sunday, 9 October 2011
Opus Gluei Challenge #115. Back into the swing of things.
Firstly I apologize for not visiting everyone the last few weeks, things appear to be going to hell in a handbasket around my neck of the woods but this too will pass.
The lovely Deena over at Opus Gluei has challenged us to be inspired by the word SWING whether it be literally or getting back into a routine after the school holidays or even a swing in your step.
For me getting back into my crafting swing/routine is making comedy art, or things that make me laugh anyway. So here is a very topical card.
Click on it to make it bigger.
I think Jeepers now looks very like an anamatronic fortune teller in one of the machines you used to find in amusement arcades on seaside piers in England.
They always seemed quite creepy to me, but it didn't stop me putting my 10p in for my fortune to be told.
Happy creating!
Gini
xx
The lovely Deena over at Opus Gluei has challenged us to be inspired by the word SWING whether it be literally or getting back into a routine after the school holidays or even a swing in your step.
For me getting back into my crafting swing/routine is making comedy art, or things that make me laugh anyway. So here is a very topical card.
Click on it to make it bigger.
We have Jeepers from Stampotique Originals and the cobweb,spider border and bat from this Inkadinkado set called creepy crawly.
I think Jeepers now looks very like an anamatronic fortune teller in one of the machines you used to find in amusement arcades on seaside piers in England.
They always seemed quite creepy to me, but it didn't stop me putting my 10p in for my fortune to be told.
Happy creating!
Gini
xx
Tuesday, 27 September 2011
Opus Gluei Challenge #114. Owl always love you. 3D floating front card.
The lovely Electra over at Opus Gluei has challenged us this time to create something using Owls as the theme.
I'm late this week as I've only just got my computer back from the menders with it having been gone a whole week!
Fortunately the sky did not fall down nor did I suffer separation anxiety, both of which comes as a bit of a surprise to me. Who knew you could live without a computer...
I am going through a phase of making projects out of my 3 years worth of Craft Stamper magazines.
I love 3 dimensional cards and this triangle style is just fabulous.
It is a Joanne Wardle designed template from page 53 of the April 2011 edition of Craft Stamper.
I have used Owl with Wings from Stampotique Originals coloured with Derwent Inktense pencils. The background is sponged with Tumbled Glass and Shabby Shutters Distress Inks. The trees are Creative Expressions stamps, create a scene - trees. The seagulls are Chocolate Baroque stamp set Seaside Ted. All stamped with Versafine black and smokey grey inks and the trees are glittered.
Happy Creating!
Gini
xx
I'm late this week as I've only just got my computer back from the menders with it having been gone a whole week!
Fortunately the sky did not fall down nor did I suffer separation anxiety, both of which comes as a bit of a surprise to me. Who knew you could live without a computer...
I am going through a phase of making projects out of my 3 years worth of Craft Stamper magazines.
I love 3 dimensional cards and this triangle style is just fabulous.
It is a Joanne Wardle designed template from page 53 of the April 2011 edition of Craft Stamper.
I have used Owl with Wings from Stampotique Originals coloured with Derwent Inktense pencils. The background is sponged with Tumbled Glass and Shabby Shutters Distress Inks. The trees are Creative Expressions stamps, create a scene - trees. The seagulls are Chocolate Baroque stamp set Seaside Ted. All stamped with Versafine black and smokey grey inks and the trees are glittered.
Happy Creating!
Gini
xx
Sunday, 11 September 2011
Opus Gluei Challenge #113. Dancing with the Poobahs.
Jana has set this fortnight's Opus Gluei challenge as any project inspired by dancing.
Loads of possibilities in this one aren't there?
Good, go get yer gear out and create something then, I am looking forward to coming and looking at what you make.
After I'd done multiple pirouettes in the very tight space that is my craft room (that didn't end too well), I settled down with Twinkie and David Bowie and danced the night away...
Click on it to make it bigger.
In the spirit of finding my inner grunge, did you notice the torn paper?
That was me, I TORE IT.
It's a twelve step plan; Finding your Inner Grunge.
In baby steps, just baby steps.
Although from observation, it seems to be a natural state of being in teenage boys. Alas I am not a teenage boy so I'm having to work very hard at it.
Stamps used Crafty Secrets Twinkle stars which a great little set of clear stamps with lots of different stars including shooting stars, perfect for creating a night scene.
Stampotique Originals; Twinkie; Wee Owl; Small Moon; and Puss Puss.
David Bowie is not a stamp but a singer songwriter. Just saying...in case you are a youngster.
Happy creating!
Gini
xx
Loads of possibilities in this one aren't there?
Good, go get yer gear out and create something then, I am looking forward to coming and looking at what you make.
After I'd done multiple pirouettes in the very tight space that is my craft room (that didn't end too well), I settled down with Twinkie and David Bowie and danced the night away...
Click on it to make it bigger.
In the spirit of finding my inner grunge, did you notice the torn paper?
That was me, I TORE IT.
It's a twelve step plan; Finding your Inner Grunge.
In baby steps, just baby steps.
Although from observation, it seems to be a natural state of being in teenage boys. Alas I am not a teenage boy so I'm having to work very hard at it.
Stamps used Crafty Secrets Twinkle stars which a great little set of clear stamps with lots of different stars including shooting stars, perfect for creating a night scene.
Stampotique Originals; Twinkie; Wee Owl; Small Moon; and Puss Puss.
David Bowie is not a stamp but a singer songwriter. Just saying...in case you are a youngster.
Happy creating!
Gini
xx
Thursday, 8 September 2011
Stampotique Designer's Challenge #37 Bookmark and #36 Altering a book page.
This fortnight's Stampotique Designer's Challenge is to make a bookmark.
Not easy if you like dimension, as you can't use it on bookmarks which is what generally puts me off making them.
Hands up who has got the Tim Holtz Filmstrip Frames Sizzix die?
Keep your hand up if you've found a good layout for using it on a card.
No, me neither.
I haven't even seen one out in my travels around blogsville.
The best I can think of is making two, filling them with pictures and putting them mostly vertically but crossing over one another and having some designer paper somewhere.
Or stamping some sort of scene or collage arrangement on a card base and laying an empty filmstrip over it or making snapshots from the scene to go in the filmstrip.
But none of these ideas has inspired me to actually want to make them.
Oooh but I don't need to care about sticking it on a card anymore because I can make bookmarks with it instead and so can you- yay - no more guilt about a white elephant purchase.
Stampotique characters from the top are; Sheer, Heart Throb, Three in a round, Mort has a Pin Curl, and Clover.
I didn't use the whole filmstrip because it is too long for paperbacks and I backed it onto textured red card and coloured with Derwent coloursoft pencils for a change.
I didn't put any ribbon or fibres on it because I don't like using bookmarks that have them, they might look nice and dangly but they are annoying to read with them. I find it's always better to use my eyes.
I did the SDC#36 Alter a page too but forgot to blog it (I'm still not fit and well and I think my brain is somewhere south of Spain. My body has never been to South of Spain or even Spain for that matter.)
I can't remember where I read the quote that "Real men have duct tape in their trucks". I didn't know what Duct Tape was and had to google it.
(It's that wide grey, cloth backed tape that I know as Electrical Tape, you might know it as John.)
Anyhoo it gave me the idea for this picture in my watercolour book.
Click on it to make it bigger.
It reads: Men are from Mars, Women are from Venus.
Heart throb is saying "Real men always have duct tape in their vans."
Girl with heart Purse is saying "What is duct tape?"
Ha!
Happy Creating!
Gini
xx
Not easy if you like dimension, as you can't use it on bookmarks which is what generally puts me off making them.
Hands up who has got the Tim Holtz Filmstrip Frames Sizzix die?
Keep your hand up if you've found a good layout for using it on a card.
No, me neither.
I haven't even seen one out in my travels around blogsville.
The best I can think of is making two, filling them with pictures and putting them mostly vertically but crossing over one another and having some designer paper somewhere.
Or stamping some sort of scene or collage arrangement on a card base and laying an empty filmstrip over it or making snapshots from the scene to go in the filmstrip.
But none of these ideas has inspired me to actually want to make them.
Oooh but I don't need to care about sticking it on a card anymore because I can make bookmarks with it instead and so can you- yay - no more guilt about a white elephant purchase.
Stampotique characters from the top are; Sheer, Heart Throb, Three in a round, Mort has a Pin Curl, and Clover.
I didn't use the whole filmstrip because it is too long for paperbacks and I backed it onto textured red card and coloured with Derwent coloursoft pencils for a change.
I didn't put any ribbon or fibres on it because I don't like using bookmarks that have them, they might look nice and dangly but they are annoying to read with them. I find it's always better to use my eyes.
I did the SDC#36 Alter a page too but forgot to blog it (I'm still not fit and well and I think my brain is somewhere south of Spain. My body has never been to South of Spain or even Spain for that matter.)
I can't remember where I read the quote that "Real men have duct tape in their trucks". I didn't know what Duct Tape was and had to google it.
(It's that wide grey, cloth backed tape that I know as Electrical Tape, you might know it as John.)
Anyhoo it gave me the idea for this picture in my watercolour book.
Click on it to make it bigger.
It reads: Men are from Mars, Women are from Venus.
Heart throb is saying "Real men always have duct tape in their vans."
Girl with heart Purse is saying "What is duct tape?"
Ha!
Happy Creating!
Gini
xx
Sunday, 14 August 2011
Opus Gluei Challenge #111. Oh I do like to be beside the seaside and all things fishy.
It's my turn this time to set the challenge over at the Opus Gluei Challenge blog.
So are you ready to roll your trousers up, tie a knot in each corner of a man's hanky to wear on your head, get sand in your hair and sandwiches?
Then finally in the early evening, to sit on the beach with your red peeling nose eating fish and chips covered with lashings of salt, malt vinegar and red sauce (Ketchup) out of a newspaper wrapping with a useless wooden fork provided by the Fish and Chip shop and to have the setting sun in your eyes.
Yes?
Well, it's time to put all your seaside memories or fantasies into a piece of art.
It can be based on the beach, sandcastles, donkeys, shells, beach huts etc. It could be something set on the sea, maybe a watersport such as sailing or surfing or just a seagull floating on the sea contemplating his next fish and whether or not he could ever become a pirate.
Perhaps you would rather go under the waves and use fish, mammals and other marine seascapes. Sunken vessels and treasure or mythical mermaids or even Kraken's. I don't know what a Kraken looks like but maybe you could show me.
I decided to represent through the medium of art; The birth of the Stampotique Mermaids.
Now as we all know, mermaids are born out of mermaids purses, which is presumably why groups of young women in the 1980's used to dance around their handbags down the disco often drunkenly and with their singing skills enhanced by the drink in an attempt to lure mortal men to their sides. (Mine's a Barcardi and diet coke please. Why yes, these white stiletto court shoes are very attractive.) They were of course mimicking the mysterious and beautiful mermaids singing to sailors and luring them to some fishy lovin' or to their doom depending on your point of view.
This is a 10 x 12 inch canvas that is shiny shiny shiny.
Click on any picture to make it bigger.
So are you ready to roll your trousers up, tie a knot in each corner of a man's hanky to wear on your head, get sand in your hair and sandwiches?
Then finally in the early evening, to sit on the beach with your red peeling nose eating fish and chips covered with lashings of salt, malt vinegar and red sauce (Ketchup) out of a newspaper wrapping with a useless wooden fork provided by the Fish and Chip shop and to have the setting sun in your eyes.
Yes?
Well, it's time to put all your seaside memories or fantasies into a piece of art.
It can be based on the beach, sandcastles, donkeys, shells, beach huts etc. It could be something set on the sea, maybe a watersport such as sailing or surfing or just a seagull floating on the sea contemplating his next fish and whether or not he could ever become a pirate.
Perhaps you would rather go under the waves and use fish, mammals and other marine seascapes. Sunken vessels and treasure or mythical mermaids or even Kraken's. I don't know what a Kraken looks like but maybe you could show me.
I decided to represent through the medium of art; The birth of the Stampotique Mermaids.
Now as we all know, mermaids are born out of mermaids purses, which is presumably why groups of young women in the 1980's used to dance around their handbags down the disco often drunkenly and with their singing skills enhanced by the drink in an attempt to lure mortal men to their sides. (Mine's a Barcardi and diet coke please. Why yes, these white stiletto court shoes are very attractive.) They were of course mimicking the mysterious and beautiful mermaids singing to sailors and luring them to some fishy lovin' or to their doom depending on your point of view.
This is a 10 x 12 inch canvas that is shiny shiny shiny.
Click on any picture to make it bigger.
What I used.
10 x 12 inch canvas coloured with acrylics.
The sea foam is Stickles frosted lace.
The background was covered completely with DecoArt glamour dust glitter paint in Ice Crystal.
The Derwent inktense pencil coloured mermaids were overpainted with the other colours of DecoArt glamour dust glitter paint.
The text is Tim Holtz Sizzix Alterations die cutter called Typeset (which is already falling apart after about 8 uses, so it has not been a good purchase for me.)
Other Stickles colours used were Waterfall and True blue.
Fushia glitter glue by Glitz-it.
The seaweed is one of the Spellbinders shapeabilities from the foliage set.
The various swirls are from two different Sizzlits Medium sets; Butterfly, Flower and Swirl set, and the Decorative flourishes set.
The fushia border diecut is from the Papermania chipboard set called Floral.
Hope you are inspired to join in.
Plus I am entering my Mermaids Purses canvas in the Alter It monthly challenge Sirens, Mermaids and the deep blue sea.
Happy Creating!
Gini
xx
Thursday, 4 August 2011
Stampotique Designers Challenges 34 Flower Power and 35 Red, yellow and orange and 35.
The lovely Kaz has set the Stampotique Designers Challenge 35 as the colours red, orange and yellow.
So I've made this one especially for you Kaz :-)
Must have been distracted by shiny things.
When I was playing Dress Up 2010 I met Halle who told me that my blog made her think of her neighbour's boys saying "must have been distracted by shiny things" when someone misses a play in a ballgame. So this is where the quote comes from, thank you Halle.
Click on to make it bigger and let it be a lesson for all of us shiny lovers.
Quite what the lesson might be escapes me because fish out of water or not, shiny is good.
Very very good.
It's an 10 x 10 inch picture. I used acrylics on 300gsm watercolour paper for the background desert, yes I know it's not lifelike but I'm using artistic license because I'm an Artiste *cough*.
The cactus is the same watercolour paper cut into a cactus shape, painted a dark green and when dry I added heaps and heaps of green and gold glitter glues mixed together and piled on top.
Sorry about the cactus being green Kaz, but it's a cactus and it has to be green otherwise it would be just a strange coat rack.
I've used the three Daniel Torrente's mermaids from Stampotique Originals.
The lovely Gez set the previous SDC 34 as Flower Power.
So the question I was pondering - Can the power of flowers get the boys to the promised land?
Well, I would have to say that depends totally on the mood of the lady and has nothing to do with the flowers.
There are certain times of the month when even flowers sporting enormous diamonds aren't gone to get the boys to first base.
Nope, not a hope in hell.
But Weasel is ever hopeful and with a line like this how can he possibly fail?
Click on it to make it bigger (which is possibly a better line for Weasel to use).
So I've made this one especially for you Kaz :-)
Must have been distracted by shiny things.
When I was playing Dress Up 2010 I met Halle who told me that my blog made her think of her neighbour's boys saying "must have been distracted by shiny things" when someone misses a play in a ballgame. So this is where the quote comes from, thank you Halle.
Click on to make it bigger and let it be a lesson for all of us shiny lovers.
Quite what the lesson might be escapes me because fish out of water or not, shiny is good.
Very very good.
It's an 10 x 10 inch picture. I used acrylics on 300gsm watercolour paper for the background desert, yes I know it's not lifelike but I'm using artistic license because I'm an Artiste *cough*.
The cactus is the same watercolour paper cut into a cactus shape, painted a dark green and when dry I added heaps and heaps of green and gold glitter glues mixed together and piled on top.
Sorry about the cactus being green Kaz, but it's a cactus and it has to be green otherwise it would be just a strange coat rack.
I've used the three Daniel Torrente's mermaids from Stampotique Originals.
The lovely Gez set the previous SDC 34 as Flower Power.
So the question I was pondering - Can the power of flowers get the boys to the promised land?
Well, I would have to say that depends totally on the mood of the lady and has nothing to do with the flowers.
There are certain times of the month when even flowers sporting enormous diamonds aren't gone to get the boys to first base.
Nope, not a hope in hell.
But Weasel is ever hopeful and with a line like this how can he possibly fail?
Click on it to make it bigger (which is possibly a better line for Weasel to use).
It's a very red card isn't it?
Now this phrase is new to me but you may have heard it before. My son was watching Fred on youtube.com and it was a line on one of the videos. I like Fred's Annoying Orange videos. But I think it's the marmite effect though, love it or hate it.
I love romance and chickens.
Happy creating!
Gini
xx
Sunday, 17 July 2011
Opus Gluei Challenge #109 Beat the Heat.
This fortnight's Opus Gluei Challenge is to Beat the Heat.
You have until 30 July 2011 to dazzle us with your scorching project.
I'd also like to enter this card in the Sir Stampalot Anything goes Challenge.
I was so lucky because Spanky knew the answer to this straight away.
Her advice is to stay in the fridge during the day and come out to play at night when you can comfortably rush about with the wind in your fur being all windswept and dangerous.
So that's what I did, I created a night scene.
I've provided the scene but you've got to provide the windswept and dangerousness 'cos I'm too shy. *cough*
This is an aperture easel card that I came up with.
Now whilst I love aperture cards, I don't like the way you can't control the position of the card flaps on a standard card to display the scene through the aperture correctly.
Click on any picture to make it bigger.
The stamps are all Stampotique Originals. I've used Daniel Torrente's Tree and some of Jo Capper-Sandon's wonderful stamps, Wee Owl (he's sitting on the tree), Owl with wings (he's peeping out around the aperture, and he has separate wings so he can be coy like this or in full flight etc whatever takes your fancy) and Small moon.
This is a tribute to Jo as she did a similar layout on her triptych card here.
I used basic grey papers and lots of Nesties; Circles, Lacy circles, Fancy Tags and Fancy Tags 2 and a Martha Stewart butterfly punch.
I coloured with Derwent Inktense pencils.
How to make this card so it'll fold down properly to fit in the envelop.
Take two square card blanks.
Stick one flap of each card blank to each other so you have a 3 flap card.
In the picture I have used a white card blank and a red card blank to make it clearer. Click on the pictures to make them bigger.
If needed cut 1 to 2 millimeters off the front edge of the aperture panel so that the card will fold down on itself to fit in it's envelop.
Happy creating!
Gini
xx
You have until 30 July 2011 to dazzle us with your scorching project.
I'd also like to enter this card in the Sir Stampalot Anything goes Challenge.
I was so lucky because Spanky knew the answer to this straight away.
Her advice is to stay in the fridge during the day and come out to play at night when you can comfortably rush about with the wind in your fur being all windswept and dangerous.
So that's what I did, I created a night scene.
I've provided the scene but you've got to provide the windswept and dangerousness 'cos I'm too shy. *cough*
This is an aperture easel card that I came up with.
Now whilst I love aperture cards, I don't like the way you can't control the position of the card flaps on a standard card to display the scene through the aperture correctly.
Click on any picture to make it bigger.
The stamps are all Stampotique Originals. I've used Daniel Torrente's Tree and some of Jo Capper-Sandon's wonderful stamps, Wee Owl (he's sitting on the tree), Owl with wings (he's peeping out around the aperture, and he has separate wings so he can be coy like this or in full flight etc whatever takes your fancy) and Small moon.
This is a tribute to Jo as she did a similar layout on her triptych card here.
I used basic grey papers and lots of Nesties; Circles, Lacy circles, Fancy Tags and Fancy Tags 2 and a Martha Stewart butterfly punch.
I coloured with Derwent Inktense pencils.
How to make this card so it'll fold down properly to fit in the envelop.
Take two square card blanks.
Stick one flap of each card blank to each other so you have a 3 flap card.
In the picture I have used a white card blank and a red card blank to make it clearer. Click on the pictures to make them bigger.
If needed cut 1 to 2 millimeters off the front edge of the aperture panel so that the card will fold down on itself to fit in it's envelop.
Stick dimensional embelishments on the horizontal card flap to hold the easel in place. Now the aperture sits exactly where you want it so your view through the aperture is in the correct place.
To fold the card up, allow the aperture flap to fold down inside the card like this.
I was so pleased with how well this card works.
But if you know of any other way of creating this type of card I'd love to hear about it so please leave me a link in the comments.
Gini
xx
Wednesday, 27 April 2011
Alter It monthly: April - spring into Easter. Spanky does The National Portrait Gallery
Over at Alter It Monthly we can either use cogs and sprockets (I have no idea what these are) for a Steampunk make or use spring colours.
So I went for the spring colours - yay sunshiny!
The curators of the National Portrait Gallery thought the decor was looking a bit tired so they asked Spanky if she could perk it up a bit.
I was able to get some photo's of the most famous faces there after Spanky's devine facelift.
Click on any image to make it bigger.
I'll leave you with a lovely lovely thought.
Can you imagine what Spanky could do with our green and pleasant land if she was given free artistic reign for a little bit of shiny revamping of all our National Treasures?
(Actually I think Spanky is a national treasure.)
It's a wonder that she wasn't asked to dress the bride for Friday (Kate and William).
Happy creating!
Gini
xx
So I went for the spring colours - yay sunshiny!
The curators of the National Portrait Gallery thought the decor was looking a bit tired so they asked Spanky if she could perk it up a bit.
I was able to get some photo's of the most famous faces there after Spanky's devine facelift.
Click on any image to make it bigger.
This started out as one half of a chocolate box.
I'll leave you with a lovely lovely thought.
Can you imagine what Spanky could do with our green and pleasant land if she was given free artistic reign for a little bit of shiny revamping of all our National Treasures?
(Actually I think Spanky is a national treasure.)
It's a wonder that she wasn't asked to dress the bride for Friday (Kate and William).
Happy creating!
Gini
xx
Friday, 22 April 2011
Opus Gluei Challenge #98 - It's in the bag. Tarzan and Jane were swinging on a vine.
The funny ladies over at Opus Gluei this week have challenged us all to get inspiration from the contents of our handbag and make something gorgeous.
My handbag is very small and boring (more of that later) but Spanky's is not.
It is outrageously shiny and beautiful.
So I asked if I could have a look inside.
Well; it's like the tardis in there, I had to do a double take but I think I could see a good part of the Brazilian Rainforest.
Now who did I spot but Tarzan and Jane.
Click on any picture to make it bigger.
I tried to get a shinier shot, but you know how they don't work out very well for me...
Now I showed real restraint in what they were saying because I originally thought Tarzan might be saying "Mind the goolies pet" but thought I'd better behave myself seeing as I'm not Spanky.
The actors are Toby and Minky Girl, Stampotique Originals and the art work of Daniel Torrente.
I've also used a Magnolia Doohicky die cutter for the leaves of the vine coloured with metallic acrylics and stickles in the wonderful shade of lime green. The netting was glued on with Golden gel medium in regular matt finish with some parts painted with metallic green. I put loads of pale green jewels in between the netting but they don't show up very well in the photo. Tarzan and Jane were coloured with Derwent Inktense pencils.
On to my handbag, which is very boring and hardly used because my back has been too bad to carry one on the rare occasion I was able to get out over the last month, no don't feel sorry for me, it is loads better now.
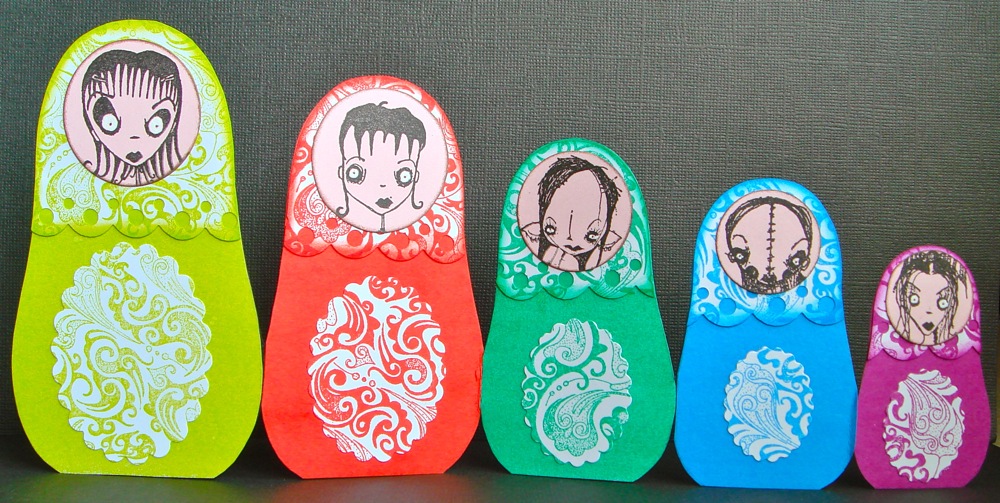
Well, I focused on the word "inside" because I was struggling, and seeing as you find Russian dolls inside each other and there was a card template for them in a recent edition of Quick Cards, I made some Russian doll cards, only I used inks instead of designer papers. They were fiddle faffy and involved copious maths sums and I don't plan on making them again any time soon.
I used Andirondack dye inks in Citrus, Clover, Red Pepper, Sailboat blue and Wild Plum. Lovely bright shades that I brayered onto white card to get the solid colours and I used a pretty but small background stamp by Penny Black called Paisley swirls.
The girls themselves are on pale pink card and from biggest doll to smallest doll are Two Barrettes, Girl with Lunchbox, Minky Girl, Stitch and Gooseneck. Again more Daniel Torrente stamps by Stampotique Originals.
Happy creating!
Gini
xx
My handbag is very small and boring (more of that later) but Spanky's is not.
It is outrageously shiny and beautiful.
So I asked if I could have a look inside.
Well; it's like the tardis in there, I had to do a double take but I think I could see a good part of the Brazilian Rainforest.
Now who did I spot but Tarzan and Jane.
Click on any picture to make it bigger.
I tried to get a shinier shot, but you know how they don't work out very well for me...
Now I showed real restraint in what they were saying because I originally thought Tarzan might be saying "Mind the goolies pet" but thought I'd better behave myself seeing as I'm not Spanky.
The actors are Toby and Minky Girl, Stampotique Originals and the art work of Daniel Torrente.
I've also used a Magnolia Doohicky die cutter for the leaves of the vine coloured with metallic acrylics and stickles in the wonderful shade of lime green. The netting was glued on with Golden gel medium in regular matt finish with some parts painted with metallic green. I put loads of pale green jewels in between the netting but they don't show up very well in the photo. Tarzan and Jane were coloured with Derwent Inktense pencils.
On to my handbag, which is very boring and hardly used because my back has been too bad to carry one on the rare occasion I was able to get out over the last month, no don't feel sorry for me, it is loads better now.
Well, I focused on the word "inside" because I was struggling, and seeing as you find Russian dolls inside each other and there was a card template for them in a recent edition of Quick Cards, I made some Russian doll cards, only I used inks instead of designer papers. They were fiddle faffy and involved copious maths sums and I don't plan on making them again any time soon.
I used Andirondack dye inks in Citrus, Clover, Red Pepper, Sailboat blue and Wild Plum. Lovely bright shades that I brayered onto white card to get the solid colours and I used a pretty but small background stamp by Penny Black called Paisley swirls.
The girls themselves are on pale pink card and from biggest doll to smallest doll are Two Barrettes, Girl with Lunchbox, Minky Girl, Stitch and Gooseneck. Again more Daniel Torrente stamps by Stampotique Originals.
Happy creating!
Gini
xx
Thursday, 24 March 2011
Less is more Challenge, Week 7 Masculine. Twinkie loves to juggle.
The Less is more challenge this week is a masculine card.
Now I don't know about you, but I find it is really easy to make a "less is more" type of card that is MHEH and that it's really quite hard to make one that actually makes you think WOW.
Mandi and Chrissie who run this challenge certainly do Wow cards.
But I do love a challenge.
This one's not quite a wow but I like it.
Now I bought some of this dotty Card Candy 'cos I can't resist polka dots and thought Twinkie 6103 could practice his juggling.
Happy creating!
Gini
xx
Now I don't know about you, but I find it is really easy to make a "less is more" type of card that is MHEH and that it's really quite hard to make one that actually makes you think WOW.
Mandi and Chrissie who run this challenge certainly do Wow cards.
But I do love a challenge.
This one's not quite a wow but I like it.
Now I bought some of this dotty Card Candy 'cos I can't resist polka dots and thought Twinkie 6103 could practice his juggling.
Click on him to make him bigger.
Twinkie is rather good at juggling isn't he?
Juggling 4 balls is quite a feat.
Can you juggle?
I can.
Oh yes, I can juggle with 2 balls rather slowly.
I only said I could juggle, not that I was any good at it...I think I am marginally better at jiggling.
What's one little vowel between friends.
I don't have the patience to practice, not when there is paper and glue and shiny in the world just sitting there; waiting.
Happy creating!
Gini
xx
Wednesday, 23 March 2011
Stampotique Triptych Card challenge. Spanky does The Birth of Venus.
The Stampotique Challenge for the next fortnight is to make a Triptych card using Stampotique only stamps.
There is a random draw to win $30 to spend in the Stampotique store, which you need to win because have you seen the new stamps released this month? Jo Capper Sanderson has some new stamps including two wonderful owls and Daniel Torrente has done 3 mermaids and other fabulous animals. There goes my crafting budget for this month. Life is always sunny in the Land of Shiny.
But this is my last project for Stampotique as guest designer, aaaw.
So what did Spanky make huh?
She had a ball with this one and whizzed back in time to 1484 and is the Official Queen of Ginger this fine spring morning.
Click on any image to make it bigger.
Mirror, Mirror on the tree,
Who's as pretty as can be?
There is a random draw to win $30 to spend in the Stampotique store, which you need to win because have you seen the new stamps released this month? Jo Capper Sanderson has some new stamps including two wonderful owls and Daniel Torrente has done 3 mermaids and other fabulous animals. There goes my crafting budget for this month. Life is always sunny in the Land of Shiny.
But this is my last project for Stampotique as guest designer, aaaw.
So what did Spanky make huh?
She had a ball with this one and whizzed back in time to 1484 and is the Official Queen of Ginger this fine spring morning.
Click on any image to make it bigger.
Mirror, Mirror on the tree,
Who's as pretty as can be?
Now just in case you don't immediately recognise (as if!) Sandro Botticelli's The Birth of Venus, here is the centre of the painting.
Now everything that could possibly go wrong whilst making this; did go wrong and a few more previously undiscovered errors to boot.
It's just as well that the "Spanky does.." are my favourite makes.
The triptych template I used is this free one from Mirkwood Designs.
They also have a paypal button for donations to support their endeavours.
The background paper is by Basic Grey from the Urban Prairie range.
If I had to choose a Basic Grey range I had to marry it would be this one.
I used Versamark and Cosmic Shimmer embossing powder in Copper Bronze Lustre for the Large Lace background stamp. Isn't it gorgeous like this?
The one and only Stitch has embroidery floss hair glued onto card using Golden Gel medium. Anything is possible using gel medium as a glue.
If I had to choose a glue I had to marry it would be this one.
I had to go a bit lower with her hair than is esthetically pleasing but I needed to cover up her claws and then rearrange her arms.
The colouring is with Derwent coloursoft pencils. You really can't go wrong with any Derwent pencils.
If I had to choose a pencil I had to marry it would be a Derwent one.
Now the tiny gold stars are new (to me) and I didn't do a test glue with them, so I ran a line of Glossy accents around the edge and wow did a lot more of them stick than I had planned.
The beads at the bottom are Suze Weinberg's Beadazzles in Electric slide (also new to me) and oh my, don't they go everywhere, they just followed the little stars...absolutely everywhere.
The mirror is made out of mirror card with silver stickles around it.
Whichever Daniel Torrente lady character stamp I am working with becomes my favourite stamp.
If I had to choose a stamp company I had to marry it would be Stampotique :-)
Happy creating everyone!
Gini
xx
Wednesday, 16 March 2011
Stampotique Guest Designer March, The Chicks Round House Home
This is my second project as Guest Designer in March for Stampotique.
In The Land of Shiny live the circus performing Chicks, and they have built for themselves a cheerful, shiny Round House.
They roost by perching on a chair at night.
Triangular chick doesn't like to sleep on her own so she doubles up with either of the round chicks. Unfortunately square chick makes for an angular and therefore uncomfortable bedfellow.
This started out life as a Pringles tube container.
Click on any picture to make it bigger.
The flowers are Heart Flowers 9107.
I used versafine black ink heat embossed with clear powder. Coloured the flowers with Cosmic Shimmer watercolour paint and used foam pads as the adhesive.
The stems are bugle beads glued onto the house with Anita's 3D clear gloss finish (substitute with Glossy Accents if you don't have this.) Anita's is thinner and therefore easier to use as this kind of glue. It also gives a stronger bond than Glossy Accents.
The walls and roof of the house are watercolours on very thick finest quality white card. Whether you use card or thick watercolour paper it mustn't stretch and buckle (go wavy and unflat) because you can't wallpaper with buckled card as it looks dreadful.
Or you could stamp onto designer paper like Basic Grey plain coloured 12" card if you can't get an unbuckled finish. Alternatively you could try brayering using ink which isn't so wet.
All wallpaper glued on with extra strong doubled sided tape (red backed).
The background stamp is the brilliant Large Lace Background 5177 and I used worn lipstick distress ink. Loads of things you can do with this versatile stamp.
If you would like to have a go at a round house I give more instructions here.
Be warned though, in case you don't like fiddly things, as they are fiddly to do especially if you wallpaper them.
It is easier to do if you cover the round container with lots of tissue paper (glue with gel medium or mod podge or my least favourite for this job - white PVA) and then paint it.
Happy creating!
Gini
xx
In The Land of Shiny live the circus performing Chicks, and they have built for themselves a cheerful, shiny Round House.
They roost by perching on a chair at night.
Triangular chick doesn't like to sleep on her own so she doubles up with either of the round chicks. Unfortunately square chick makes for an angular and therefore uncomfortable bedfellow.
This started out life as a Pringles tube container.
Click on any picture to make it bigger.
The chicks are Chick shapes (4 sided cube) 9111 and I have paper pieced their bodies.
The bling on the roof is glued on with Golden Gel Medium in the Heavy gel (matte).
The flowers are Heart Flowers 9107.
I used versafine black ink heat embossed with clear powder. Coloured the flowers with Cosmic Shimmer watercolour paint and used foam pads as the adhesive.
The stems are bugle beads glued onto the house with Anita's 3D clear gloss finish (substitute with Glossy Accents if you don't have this.) Anita's is thinner and therefore easier to use as this kind of glue. It also gives a stronger bond than Glossy Accents.
The chairs are 3 chairs 9179
The walls and roof of the house are watercolours on very thick finest quality white card. Whether you use card or thick watercolour paper it mustn't stretch and buckle (go wavy and unflat) because you can't wallpaper with buckled card as it looks dreadful.
Or you could stamp onto designer paper like Basic Grey plain coloured 12" card if you can't get an unbuckled finish. Alternatively you could try brayering using ink which isn't so wet.
All wallpaper glued on with extra strong doubled sided tape (red backed).
The background stamp is the brilliant Large Lace Background 5177 and I used worn lipstick distress ink. Loads of things you can do with this versatile stamp.
If you would like to have a go at a round house I give more instructions here.
Be warned though, in case you don't like fiddly things, as they are fiddly to do especially if you wallpaper them.
It is easier to do if you cover the round container with lots of tissue paper (glue with gel medium or mod podge or my least favourite for this job - white PVA) and then paint it.
Happy creating!
Gini
xx
Wednesday, 9 March 2011
Stampotique Challenge, Animals, Birds and Insects
The Stampotique Challenge for the next two weeks can be found here.
A fabulous challenge with oodles and oodles of possibilities and you can use any stamps in your project.
Last week we saw the chick shapes in their paying job as circus performers. They are energetic joyful characters and this week we get to see them playing musical chairs.
I have tried to show just how good these chicks look no matter what style of creating you like; whether grungy and shiny (gotta have a bit of Shiny) or paper piecing with pretty designer papers.
Click on any image to make it bigger.
The 4 chick shapes (4 sided cube) 9111 and 3 chairs 9179 in this one are stamped with Versafine black and heat embossed with fine detail clear powder.
If you heat emboss your stamped image it makes it really easy to colour in with Cosmic Shimmer Watercolours or Twinkling H2O's because the embossing resists the watercolour paint so it easily stays inside the image.
In this one I've used pretty summer garden designer papers and paper pieced the stamped images. As you know if you're a regular here, I'm a bit of a duffer with flat card layouts (I need a lot more practice, about 2256 more cards worth I think) but you get the general idea and I'm sure you'll be able to put them in a much better layout yourself if you fancy having a go at musical chairs.
I did wonder what these two completely different styles would like if they were combined together; probably quite horrid, but I thought I'd try it out in an ATC and surprisingly this style turned out to be my favourite of the lot.
So my advice would be:
No matter how mad an idea seems to be; give it a try as an ATC.
Next week I'll show you where the chicks live.
Happy creating!
Gini
xx
A fabulous challenge with oodles and oodles of possibilities and you can use any stamps in your project.
Last week we saw the chick shapes in their paying job as circus performers. They are energetic joyful characters and this week we get to see them playing musical chairs.
I have tried to show just how good these chicks look no matter what style of creating you like; whether grungy and shiny (gotta have a bit of Shiny) or paper piecing with pretty designer papers.
Click on any image to make it bigger.
The 4 chick shapes (4 sided cube) 9111 and 3 chairs 9179 in this one are stamped with Versafine black and heat embossed with fine detail clear powder.
If you heat emboss your stamped image it makes it really easy to colour in with Cosmic Shimmer Watercolours or Twinkling H2O's because the embossing resists the watercolour paint so it easily stays inside the image.
In this one I've used pretty summer garden designer papers and paper pieced the stamped images. As you know if you're a regular here, I'm a bit of a duffer with flat card layouts (I need a lot more practice, about 2256 more cards worth I think) but you get the general idea and I'm sure you'll be able to put them in a much better layout yourself if you fancy having a go at musical chairs.
I did wonder what these two completely different styles would like if they were combined together; probably quite horrid, but I thought I'd try it out in an ATC and surprisingly this style turned out to be my favourite of the lot.
So my advice would be:
No matter how mad an idea seems to be; give it a try as an ATC.
Next week I'll show you where the chicks live.
Happy creating!
Gini
xx
Tuesday, 1 March 2011
Stampotique Mayan Circus
I'm so pleased to be given the opportunity to design some projects for Stampotique Stamps this month as their guest designer for March - woohoo!
If you've yet to visit their challenge blog Stampotique Designers Challenge, you're missing a treat as their quality wooden stamp range is very diverse and I love all the marvelous inspiration and ideas that come from their very talented design team.
For my first project I've created a Mayan Circus.
Now who knows whether or not the ancient Mayan's ever had circus events and truly, we in the land of Shiny don't actually care because you're very unlikely to find any historical accuracy here.
But this was great fun to dream up.
It's 12 inches square and you can click on any picture to make it bigger.
It's all made of cardboard and white card.
One of Stampotique's stamp designers is Amy Wilson Wellenstein and she has drawn some Mayan Images and the one that caught my eye was the
7124 Mayan Background #2
that has so much versatility not only as a background stamp but for each element of the design on it's own. It even has 4 crown's of 3 different sizes, Uri Gellar's bent forks (all the better for scooping out your heart my dear) and all sorts of fashion design accessories that Spanky coveted immediately and some interesting potential building blocks that I had my beady eye on.
Now Spanky went to town on dressing all the Torrente characters up in their finest Mayan fancy dress gear.
If you are lucky enough to get to attend a Mayan Circus you really must dress up to the nine's Mayan Style.
In the following close up's of the audience, anything yellow/gold is part of the Mayan background stamp. I stamped the background stamp multiple times onto white card and cut out all the individual elements of the design and Spanky stuck them onto the people artistically - ahem.
I used Versafine black ink for all the stamping.
White PVA craft glue for all the glueing and Derwent pencils from their Inktense range, watercolour range and Coloursoft range.
Working from Left to Right. First we have my favourite Torrente character
6057 Heart Throb Bless him - he thought he would manage just fine on his own without Spanky's help styling his costume... although there is something to be said for the appeal of a man with a tattoo on his forehead and forks through his ears. Quite what that appeal might be, I'm not sure but for every old sock there is an old shoe.
6022 Sheer Gotta admire a gal who isn't afraid of her own cleavage. (Spanky has a ginger cleavage - nuff said.)
6047 Glimmering Hope When you dress with style who needs legs?
6048 Moth Fab The more I work with these characters the more I realise that clashing colours work really well in their outfits.
6104 Eric How about those Dennis Healy eyebrows and deeley boppers?
6011 Girl with Lunchbox The poor girl doesn't have a name! How did this happen??? She looks like a Davina to me...
6051 Prom Queen
6059 Bowtie Now I think the Mayan's missed out on a real fashion statement by not utilizing the accessory power of The Sporran. Perfect for your small change, lipstick or as the indomitable posing pouch.
6080 Topknot Is this a dagger which I see before me? Topknot is a Sporran wearing Mayan Norman Bates tonight. We all go a little mad sometimes.
6052 Stitch Now Stitch was the last character I coloured and I choose colours that I thought couldn't possibly look nice together but it turned out to be my favourite colour scheme by far. Edward scissor hands? Pah! He's been usurped by Stitch the Knife Slayer.
6102 Dweeze Looking mighty fine in his kipper tie.
6104 Eric again, you can't keep a good man down.
6045 Newt with lunchbox
6071 Perl This is the first time I've given Perl brown hair and it just doesn't look right, she's a blonde through and through, but I thought blonde hair would detract from the gold forks or even (heaven for fend) clash with them.
6059 Bowtie again. Oh my, oh my what a splendid costume. I just hope your not behind him because you'll never see a thing with that huge headdress in front of you.
6025 Gooseneck. Not quite playing spoons on a wash board but very close.
6115 Weasel Aha, Weasel looks like he has nefarious plans for poor old Two Barrettes.
6024 Two Barrettes Who proves that Yes, bobby pins work well with crowns but they provide absolutely no protection from knife wielding Weasels.
6021 Girl with heart purse Another girl with no name! Poor Tink.
So onto the floor acts.
First we have 6026 Heart Boy the lion tamer holding one of the 9179 three chairs (designed by Janet Klein) controlling a very fierce 6105 Puss Puss.
He's holding a whip made out of embroidery floss and I used a section of his arm for the handle.
Then we have the amazing Chick riding cat jumping fences. The chick is one of the 4 chicks on the cube 9111 Chick shapes riding 6096 Kitty and the fence is made up of the elements of the Mayan background stamp. More embroidery floss for the reins and another element from the Mayan background to form the chick's wing (so she can hold the reins).
Followed by the wondrous chick riding cat balancing act. We have another chick from the cube 9111 Chick shapes riding another 6096 Kitty balancing on further elements from the Mayan background stamp.
And finally we have the balancing quails from the 9211 Quails cube
with 6105 Puss Puss balanced precariously on the top.
A brief look at how I made it. 'Cos you're ready for a cup of tea now aren't you?
I cut a very strong box like this. Remember you can click on any photo to make it bigger.
You can cut your supports for your freestanding characters one of two ways.
The one on the left (Heartboy) is a single layer of card with the support cut and divided up the centre and the sides folded back opposite each other.
The one on the right is made of a double layer of cardboard, glue only the stamped section together and fold back the supports opposite each other.
To decorate the floor I stamped the Mayan Background stamp in it's entirety using Antique Linen Distress ink.
My Top Tip:- Now Distress Inks are great but if your paper or card is at all porous or loosely woven then the ink will bleed and fuzz when stamped. To avoid excess bleeding, ink your stamp using a brayer to apply the ink. (If you ink the stamp directly with the distress pad you will get unwanted bleeding.)
I cut incisions in the floor where I want the images to stand. Feed the image support through the incision to the back and open up the folds. See the chair and cat in the photo.
Happy creating!
Gini
xx
If you've yet to visit their challenge blog Stampotique Designers Challenge, you're missing a treat as their quality wooden stamp range is very diverse and I love all the marvelous inspiration and ideas that come from their very talented design team.
For my first project I've created a Mayan Circus.
Now who knows whether or not the ancient Mayan's ever had circus events and truly, we in the land of Shiny don't actually care because you're very unlikely to find any historical accuracy here.
But this was great fun to dream up.
It's 12 inches square and you can click on any picture to make it bigger.
It's all made of cardboard and white card.
One of Stampotique's stamp designers is Amy Wilson Wellenstein and she has drawn some Mayan Images and the one that caught my eye was the
7124 Mayan Background #2
that has so much versatility not only as a background stamp but for each element of the design on it's own. It even has 4 crown's of 3 different sizes, Uri Gellar's bent forks (all the better for scooping out your heart my dear) and all sorts of fashion design accessories that Spanky coveted immediately and some interesting potential building blocks that I had my beady eye on.
Now Spanky went to town on dressing all the Torrente characters up in their finest Mayan fancy dress gear.
If you are lucky enough to get to attend a Mayan Circus you really must dress up to the nine's Mayan Style.
In the following close up's of the audience, anything yellow/gold is part of the Mayan background stamp. I stamped the background stamp multiple times onto white card and cut out all the individual elements of the design and Spanky stuck them onto the people artistically - ahem.
I used Versafine black ink for all the stamping.
White PVA craft glue for all the glueing and Derwent pencils from their Inktense range, watercolour range and Coloursoft range.
6057 Heart Throb Bless him - he thought he would manage just fine on his own without Spanky's help styling his costume... although there is something to be said for the appeal of a man with a tattoo on his forehead and forks through his ears. Quite what that appeal might be, I'm not sure but for every old sock there is an old shoe.
6022 Sheer Gotta admire a gal who isn't afraid of her own cleavage. (Spanky has a ginger cleavage - nuff said.)
6047 Glimmering Hope When you dress with style who needs legs?
6048 Moth Fab The more I work with these characters the more I realise that clashing colours work really well in their outfits.
6104 Eric How about those Dennis Healy eyebrows and deeley boppers?
6011 Girl with Lunchbox The poor girl doesn't have a name! How did this happen??? She looks like a Davina to me...
6051 Prom Queen
6059 Bowtie Now I think the Mayan's missed out on a real fashion statement by not utilizing the accessory power of The Sporran. Perfect for your small change, lipstick or as the indomitable posing pouch.
6080 Topknot Is this a dagger which I see before me? Topknot is a Sporran wearing Mayan Norman Bates tonight. We all go a little mad sometimes.
6052 Stitch Now Stitch was the last character I coloured and I choose colours that I thought couldn't possibly look nice together but it turned out to be my favourite colour scheme by far. Edward scissor hands? Pah! He's been usurped by Stitch the Knife Slayer.
6102 Dweeze Looking mighty fine in his kipper tie.
6104 Eric again, you can't keep a good man down.
6045 Newt with lunchbox
6071 Perl This is the first time I've given Perl brown hair and it just doesn't look right, she's a blonde through and through, but I thought blonde hair would detract from the gold forks or even (heaven for fend) clash with them.
6059 Bowtie again. Oh my, oh my what a splendid costume. I just hope your not behind him because you'll never see a thing with that huge headdress in front of you.
6025 Gooseneck. Not quite playing spoons on a wash board but very close.
6115 Weasel Aha, Weasel looks like he has nefarious plans for poor old Two Barrettes.
6024 Two Barrettes Who proves that Yes, bobby pins work well with crowns but they provide absolutely no protection from knife wielding Weasels.
6021 Girl with heart purse Another girl with no name! Poor Tink.
So onto the floor acts.
First we have 6026 Heart Boy the lion tamer holding one of the 9179 three chairs (designed by Janet Klein) controlling a very fierce 6105 Puss Puss.
He's holding a whip made out of embroidery floss and I used a section of his arm for the handle.
Then we have the amazing Chick riding cat jumping fences. The chick is one of the 4 chicks on the cube 9111 Chick shapes riding 6096 Kitty and the fence is made up of the elements of the Mayan background stamp. More embroidery floss for the reins and another element from the Mayan background to form the chick's wing (so she can hold the reins).
Followed by the wondrous chick riding cat balancing act. We have another chick from the cube 9111 Chick shapes riding another 6096 Kitty balancing on further elements from the Mayan background stamp.
And finally we have the balancing quails from the 9211 Quails cube
with 6105 Puss Puss balanced precariously on the top.
A brief look at how I made it. 'Cos you're ready for a cup of tea now aren't you?
I cut a very strong box like this. Remember you can click on any photo to make it bigger.
You can cut your supports for your freestanding characters one of two ways.
The one on the left (Heartboy) is a single layer of card with the support cut and divided up the centre and the sides folded back opposite each other.
The one on the right is made of a double layer of cardboard, glue only the stamped section together and fold back the supports opposite each other.
To decorate the floor I stamped the Mayan Background stamp in it's entirety using Antique Linen Distress ink.
My Top Tip:- Now Distress Inks are great but if your paper or card is at all porous or loosely woven then the ink will bleed and fuzz when stamped. To avoid excess bleeding, ink your stamp using a brayer to apply the ink. (If you ink the stamp directly with the distress pad you will get unwanted bleeding.)
I cut incisions in the floor where I want the images to stand. Feed the image support through the incision to the back and open up the folds. See the chair and cat in the photo.
Happy creating!
Gini
xx
Subscribe to:
Posts (Atom)